The Best Beginning Clarinet Music Pieces to Up Your Game
So you are ready to learn to play the clarinet? Sick! It’s an epic experience that lets you create beautiful melodies and harmonious sounds. And some of the best beginner clarinet music pieces to up your game are easy to learn.
As a beginner, choosing music that challenges you without overwhelming you and helps you build your skills and confidence in the instrument is essential.
In this article, we’ll introduce you to a variety of beginner clarinet music that will keep you motivated and engaged as you progress!
From classical odes and traditional melodies to popular songs and beginner-friendly variations of works by great composers, there are easy clarinet songs for every budding clarinetist to enjoy and learn from.
So grab your clarinet and get ready to explore the rich world of clarinet music – the only limit is your own imagination and musical potential.
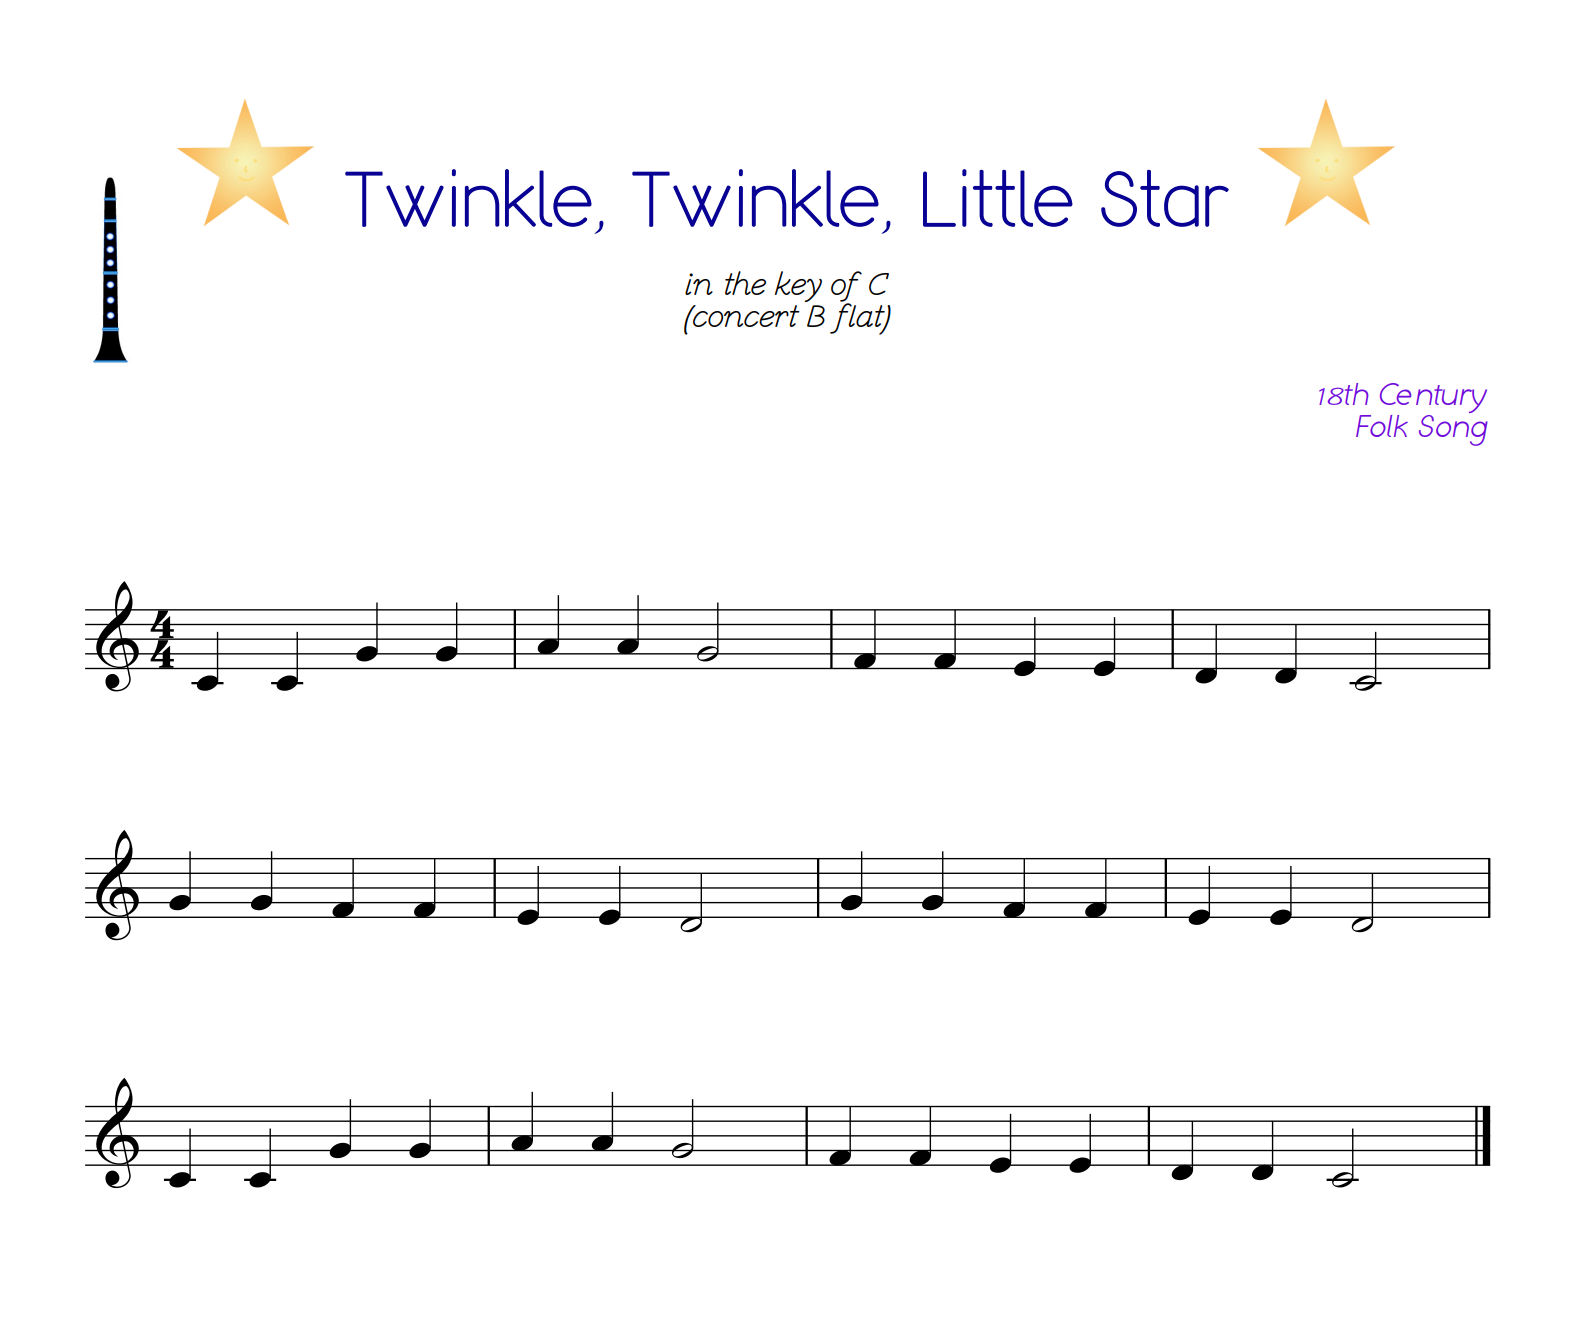
Twinkle, Twinkle, Little Star
Twinkle, Twinkle, Little Star” is a well-known melody often used as a beginner piece for clarinetists.
It’s a short and simple tune that’s easy to play, making it an excellent choice for complete beginners or for those who are just starting to learn the clarinet.
In addition to being easy to play, “Twinkle, Twinkle, Little Star” is also a great song for practicing phrasing and tone on the clarinet.
Here’s the sheet music below.
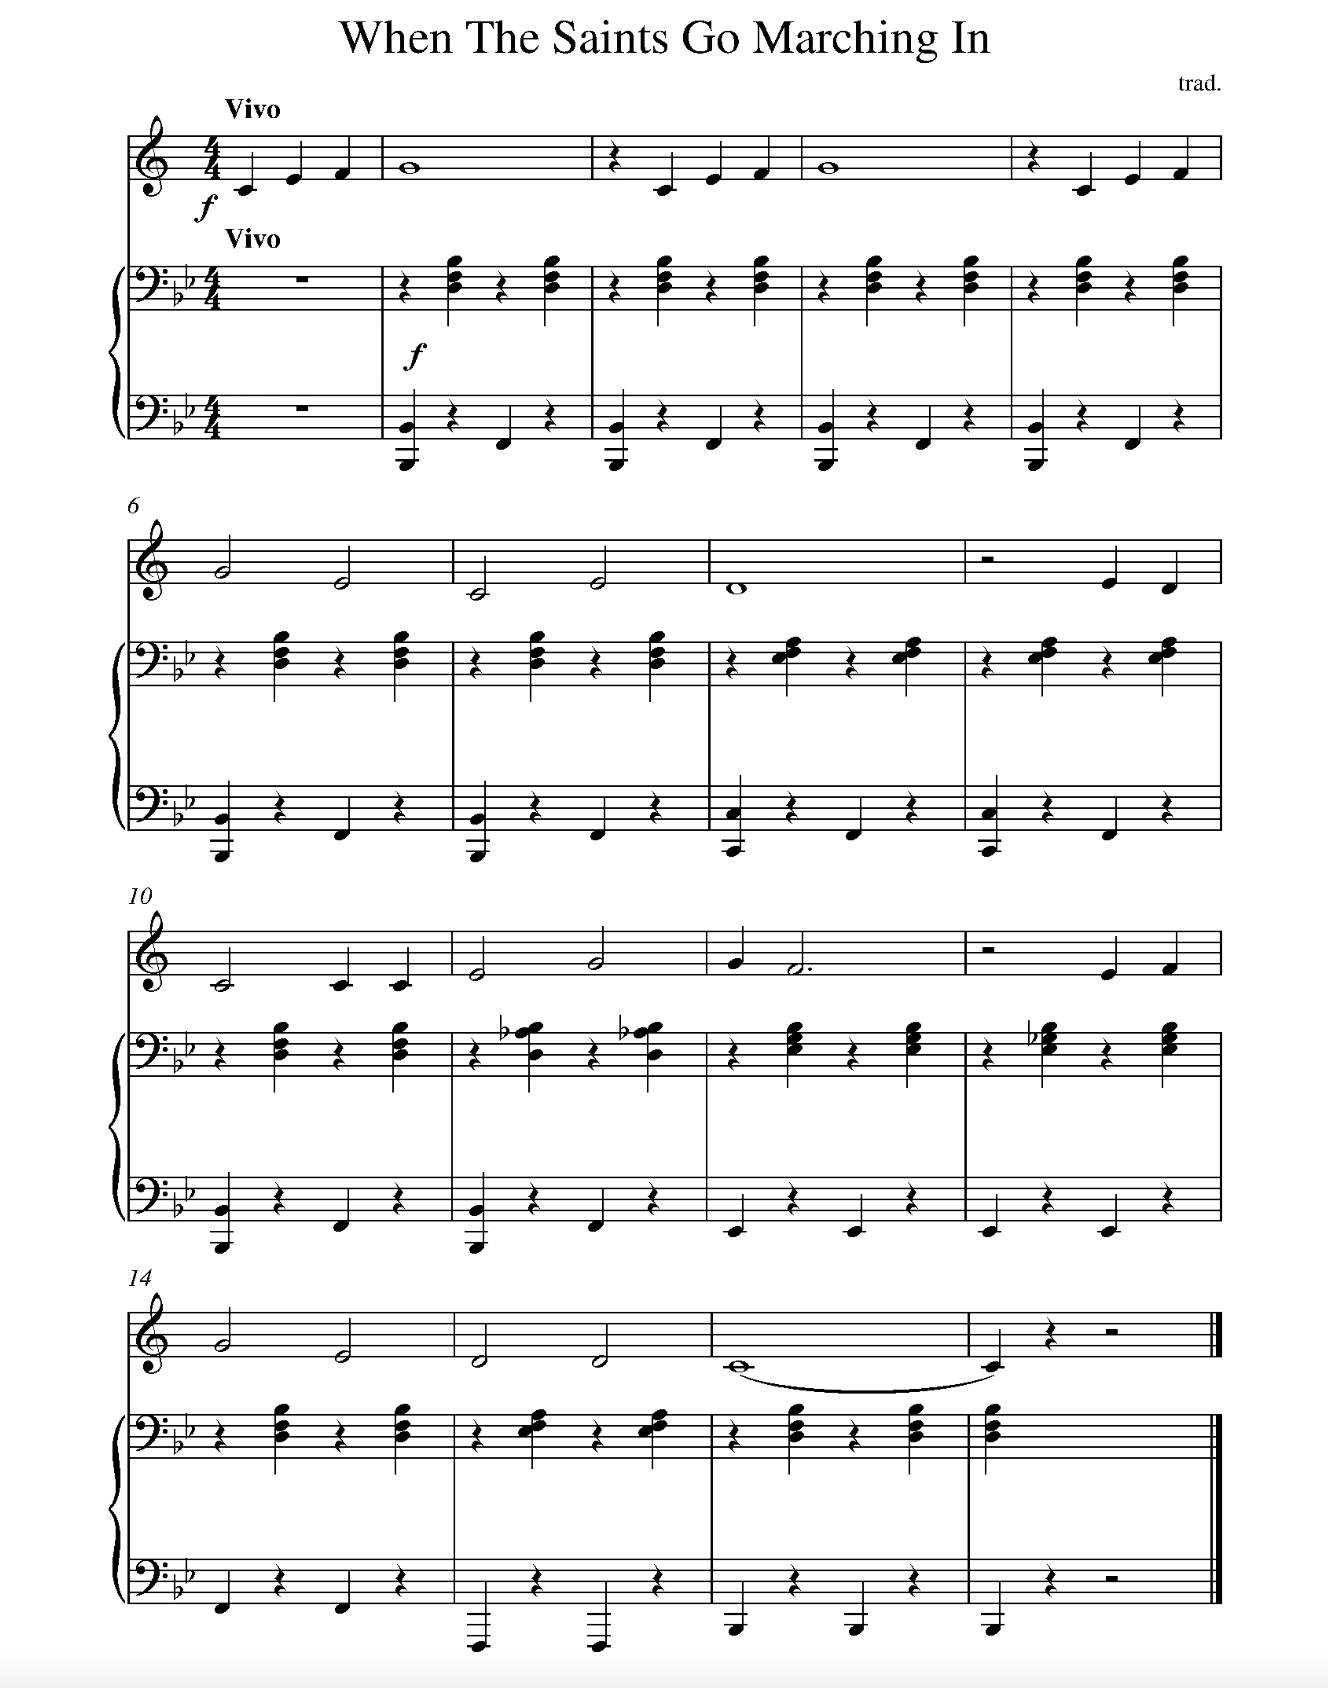
When the Saints Go Marching In (Traditional)
This next song on our easy clarinet songs list was written in the early 1900s by an unknown composer and was typically sung as gospel.
The most famous recording was by Louis Armstrong, complete with an orchestra backing. “When the Saints Go Marching In” is an excellent song for beginning clarinetists to add to their repertoire, as it is easy to learn and allows for some fun improvisation.
When playing this song on the clarinet, pay attention to your phrasing and dynamics to add expression to your performance. Here’s the sheet music below.
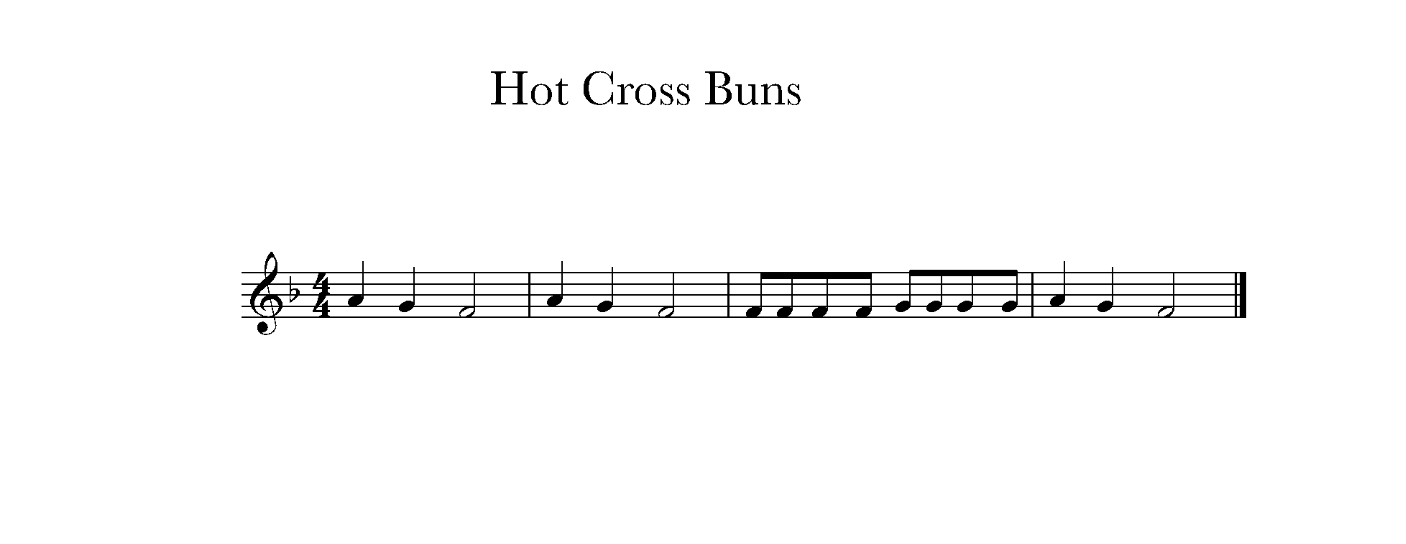
Hot Cross Buns (Traditional)
One of the most popular nursery rhymes for kids, “Hot Cross Buns,” is a simple and catchy tune that’s perfect for beginner clarinetists.
The song’s repetitive structure makes it easy to learn, and the familiar melody makes it a hit with audiences of all ages.
When playing “Hot Cross Buns” on the clarinet, focus on getting a clear and consistent tone, and pay attention to your rhythm to keep the song moving along.
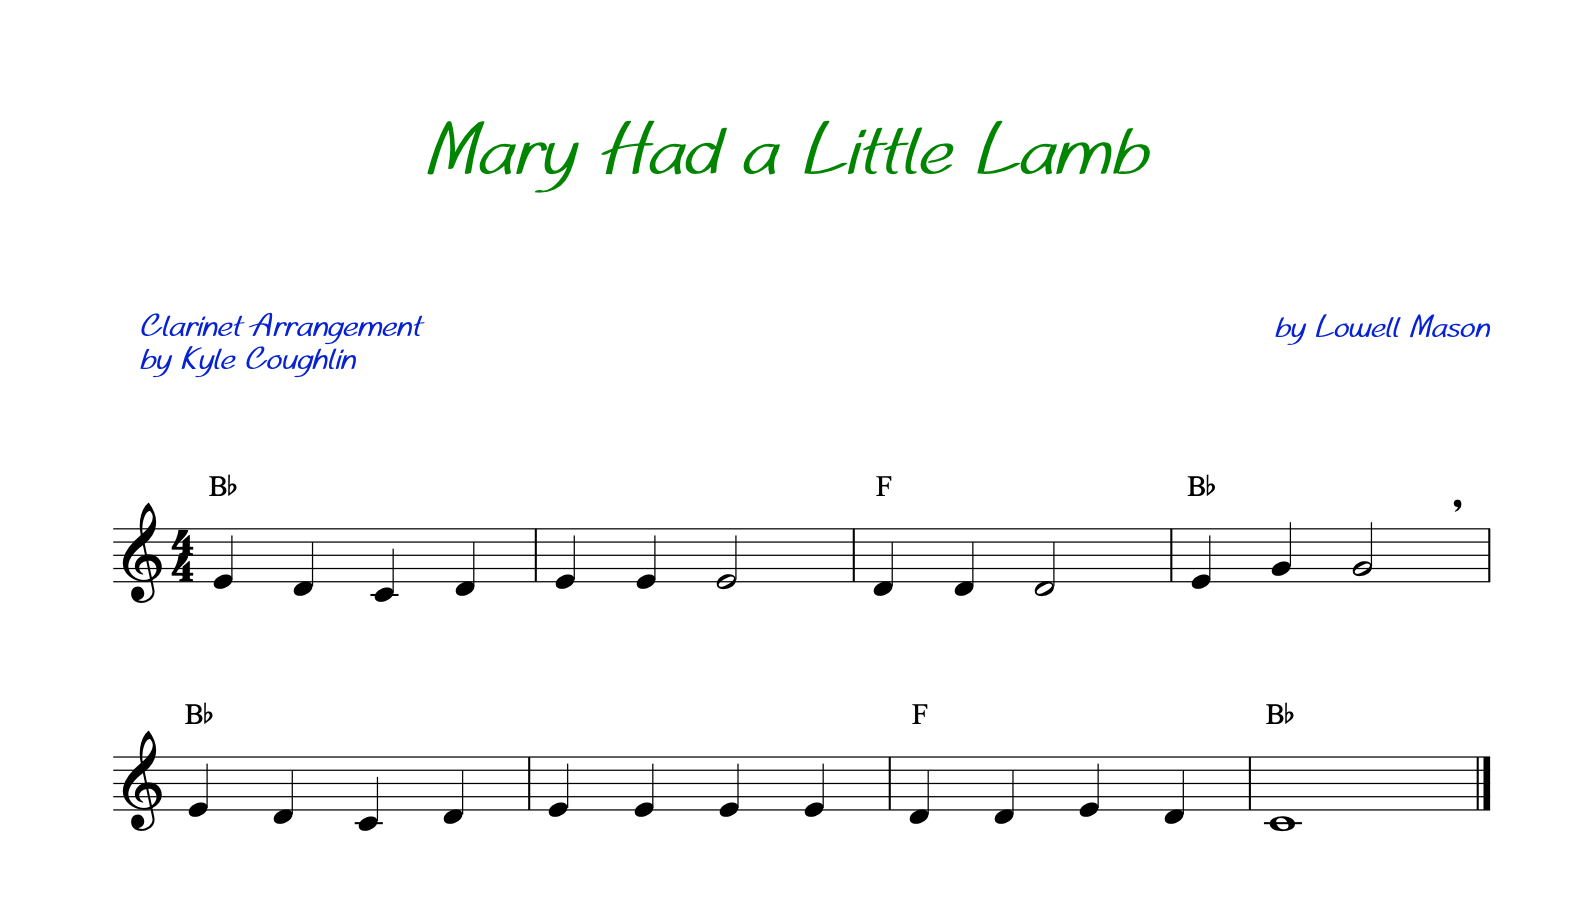
Mary Had a Little Lamb
“Mary Had a Little Lamb” is a simple nursery rhyme often used as a beginner piece for clarinetists.
It is a short and easy tune that is perfect for those who are just starting to learn the clarinet.
In addition to being easy to play, “Mary Had a Little Lamb” is also an easy song for practicing tonguing techniques on the clarinet.
Here’s the sheet music below.
Ode to Joy
“Ode to Joy” is a more challenging melody by Ludwig van Beethoven that is often used as a beginner piece for clarinetists.
Not a clarinet concerto, but It is a longer melody that is good for practicing phrasing and dynamics on the clarinet.
This melody is also a great way to get a feel for classical music and learn more about the famous composer Ludwig van Beethoven.
Here’s the sheet music below.
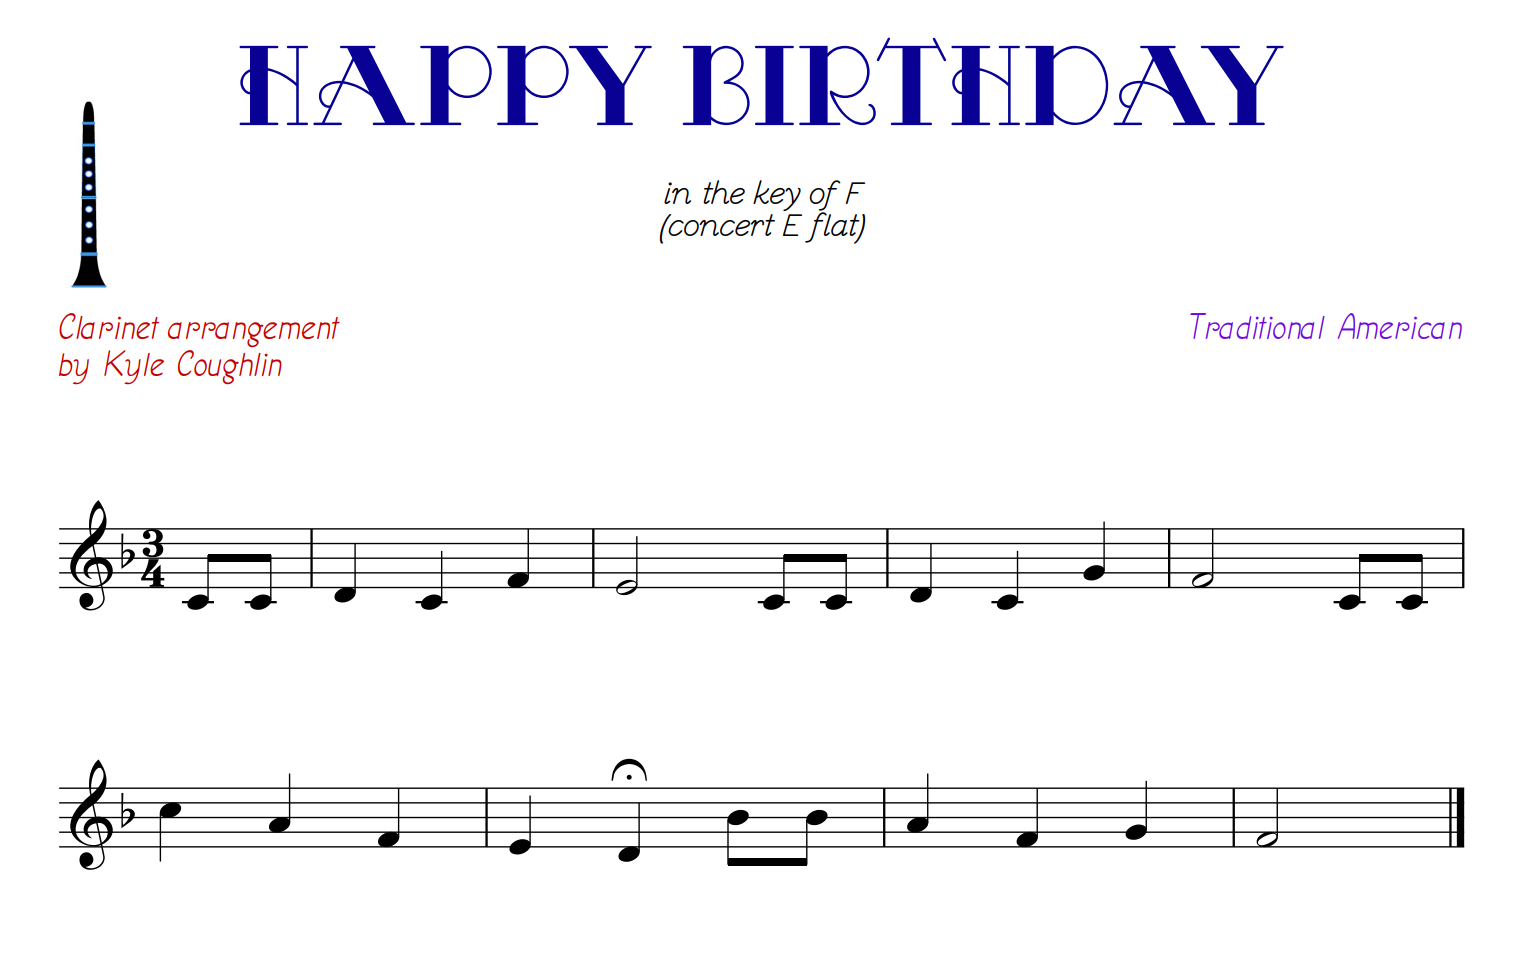
Happy Birthday
“Happy Birthday” is next on our easy clarinet songs list! This well-known celebration melody is often played as a complete beginner piece for clarinetists.
It is a simple tune that is easy to play and is suitable for practicing phrasing and tone on the clarinet. You can easily play it with a piano accompaniment from Youtube.
The whole piece is also excellent for celebrating friends’ or family members’ birthdays and adding a musical touch to the occasion.
Here’s the sheet music below.
Old MacDonald Had a Farm
E-I-E-I-Oh! You’ll love playing this 1706-written Thomas D’Urfey opera piece turned elementary school animal song over and over for the children (and children at heart) in your life.
“Old MacDonald Had a Farm” is a fun and energetic song perfect for getting kids (and adults) moving and singing along.
When playing this song on the clarinet, focus on getting a clear and consistent tone, and pay attention to your phrasing and rhythm to keep the song moving along.
Here’s the sheet music below.
Auld Lang Syne
“Auld Lang Syne” is a traditional New Year’s Eve melody often played as a beginner piece for clarinetists.
It is an easy tune that is good for practicing phrasing and tone on the clarinet.
This song is also excellent for celebrating the New Year with friends and adding a festive touch to your repertoire!
Here’s the sheet music below.
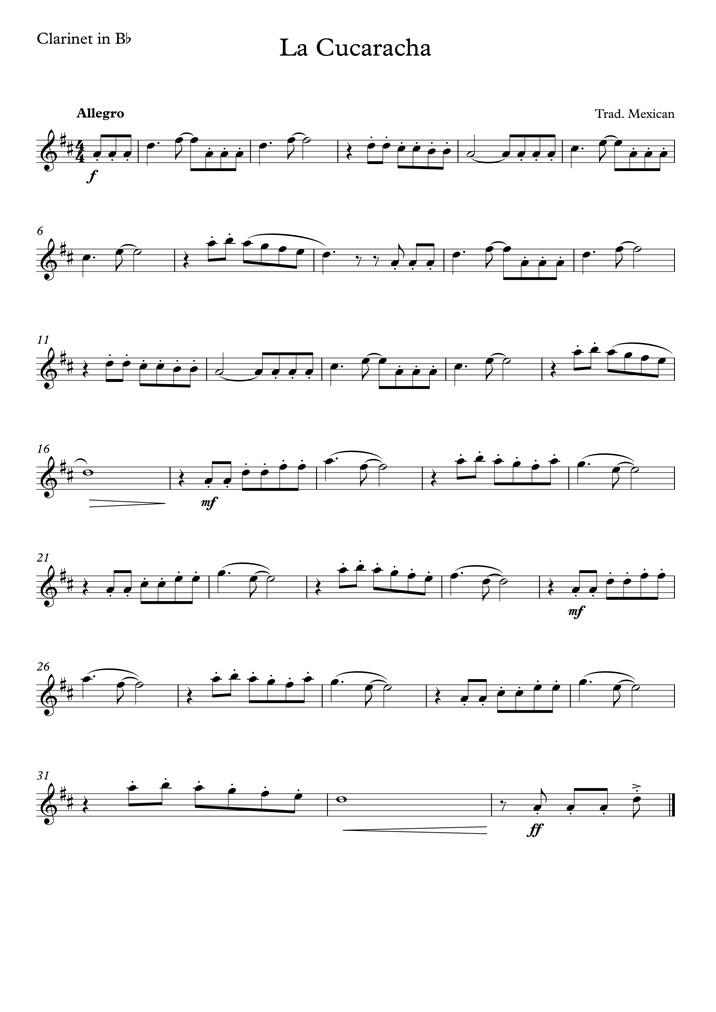
La Cucaracha
“La Cucaracha” is next on our easy clarinet songs list! With history dating back to the Mexican Revolution, this folk tune about a cockroach is sure to be an earworm.
“La Cucaracha” is a fun and energetic song perfect for livening up any gathering.
When playing this song on the clarinet, pay attention to the phrasing and rhythm to add flair to your performance.
Here’s the sheet music below.
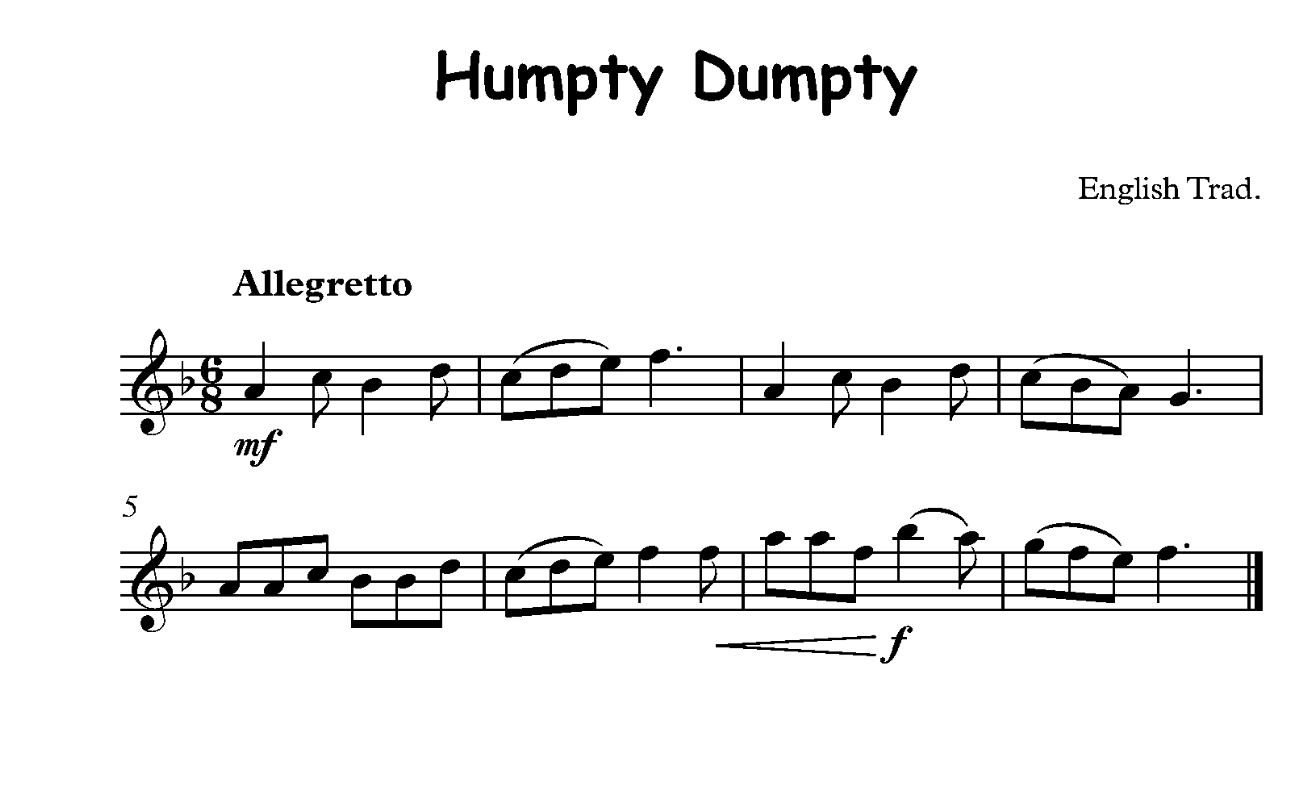
Humpty Dumpty
“Humpty Dumpty” is a simple nursery rhyme often used as a beginner piece for clarinetists.
It is an easy tune for practicing basic fingerings and tonguing on the clarinet.
This easy song is also a great choice for young musicians and for adding a touch of whimsy to your repertoire.
Here’s the sheet music below.
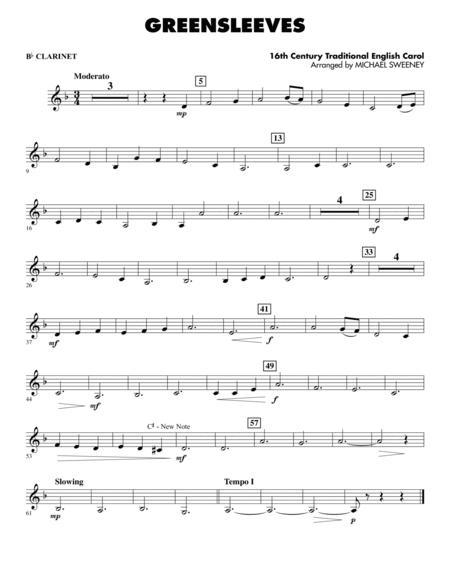
Greensleeves
“Greensleeves” is next on our easy clarinet songs list! This traditional melody is often used as a beginner piece for clarinetists.
It is an easy tune that is good for practicing phrasing and tone on the clarinet.
This melody is also a great choice for exploring different cultures and music styles and adding some diversity to your repertoire.
Here’s the sheet music below.
Swan Lake (Pyotr Ilyich Tchaikovsky)
One of the most famous classical ballets of all time, “Swan Lake” is a beautiful and iconic piece of music.
The clarinet has a prominent role in the orchestra for this ballet, and it is a challenging but rewarding piece for clarinetists to learn.
When playing “Swan Lake” on the clarinet, pay attention to the phrasing and dynamics to bring out the emotion in the music.
This is an excellent piece for more advanced clarinetists to add to their repertoire.
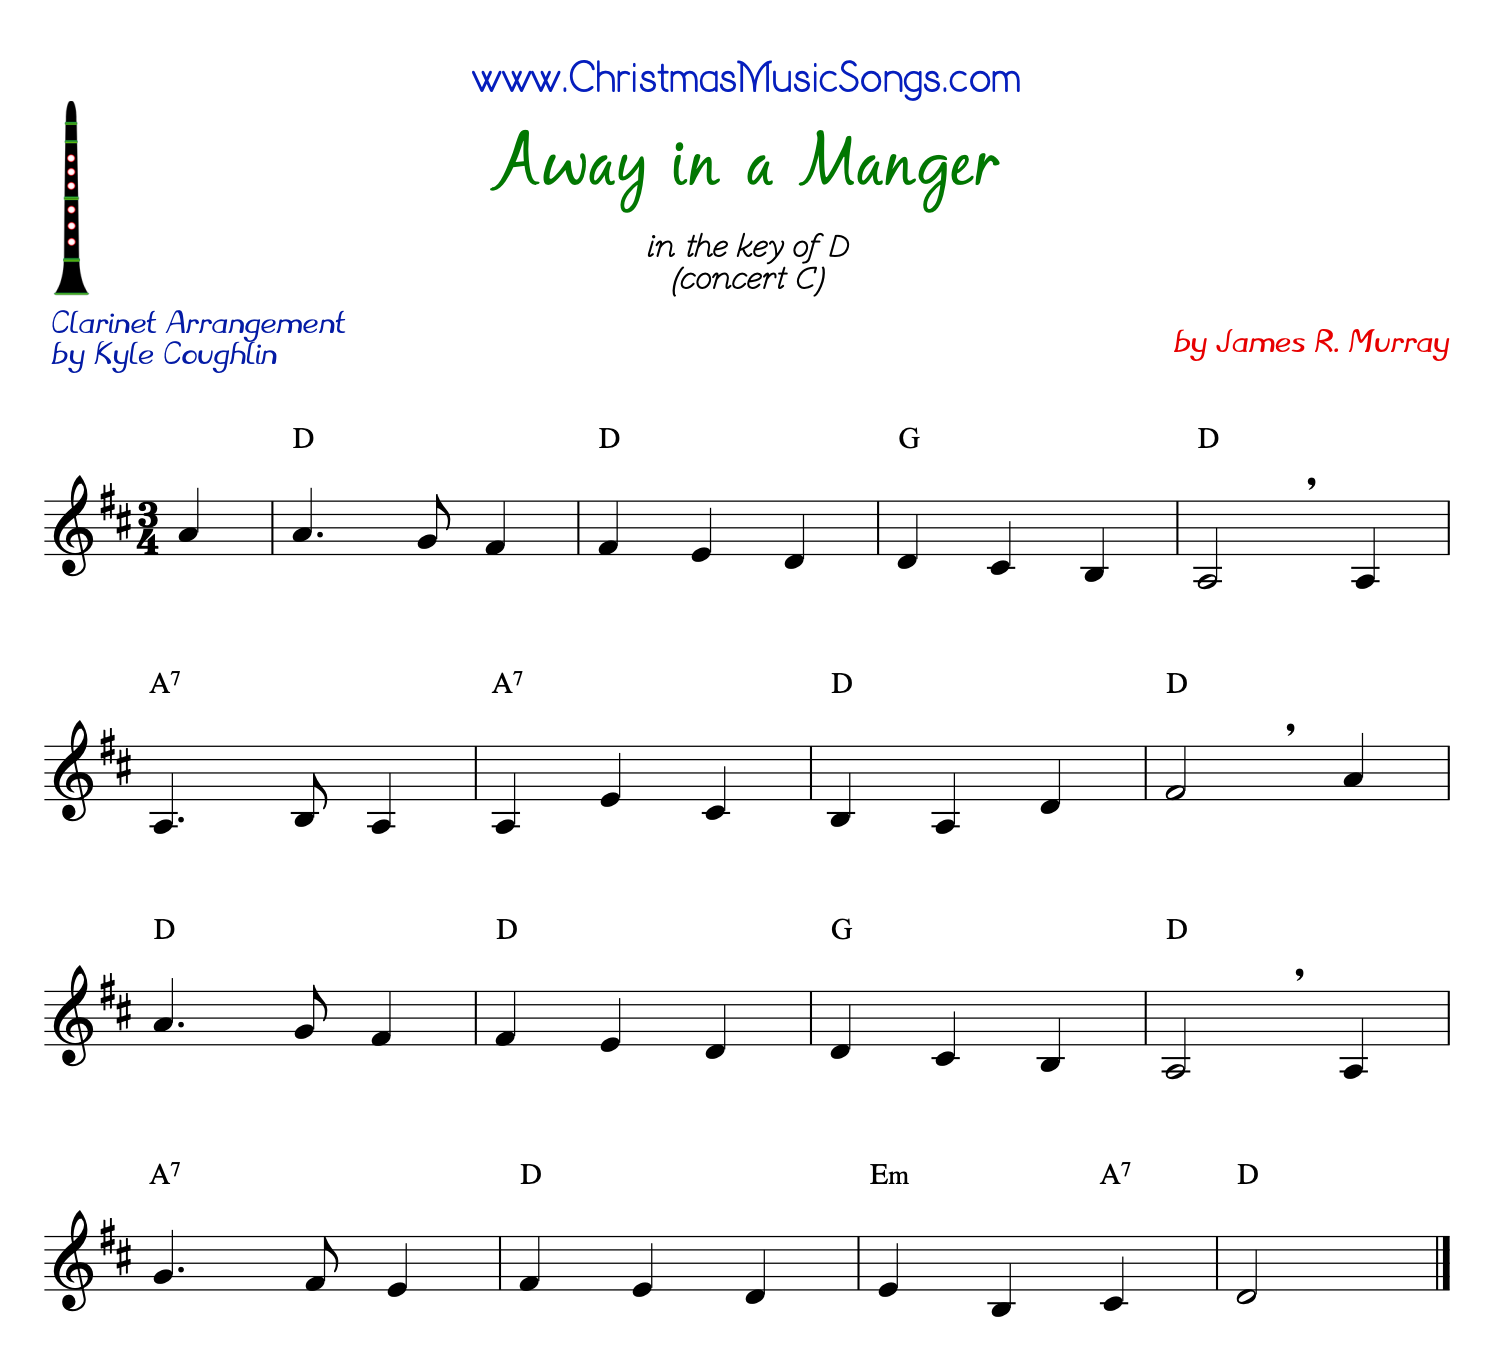
This sentimental piece dates back to the 19th century and is a Christmas carol about Jesus Christ as a newborn baby.
“Away in a Manger” is a beautiful and peaceful song perfect for getting into the holiday spirit.
When playing this song on the clarinet, pay attention to your phrasing and dynamics to add expression to your performance.
Here’s the sheet music below.
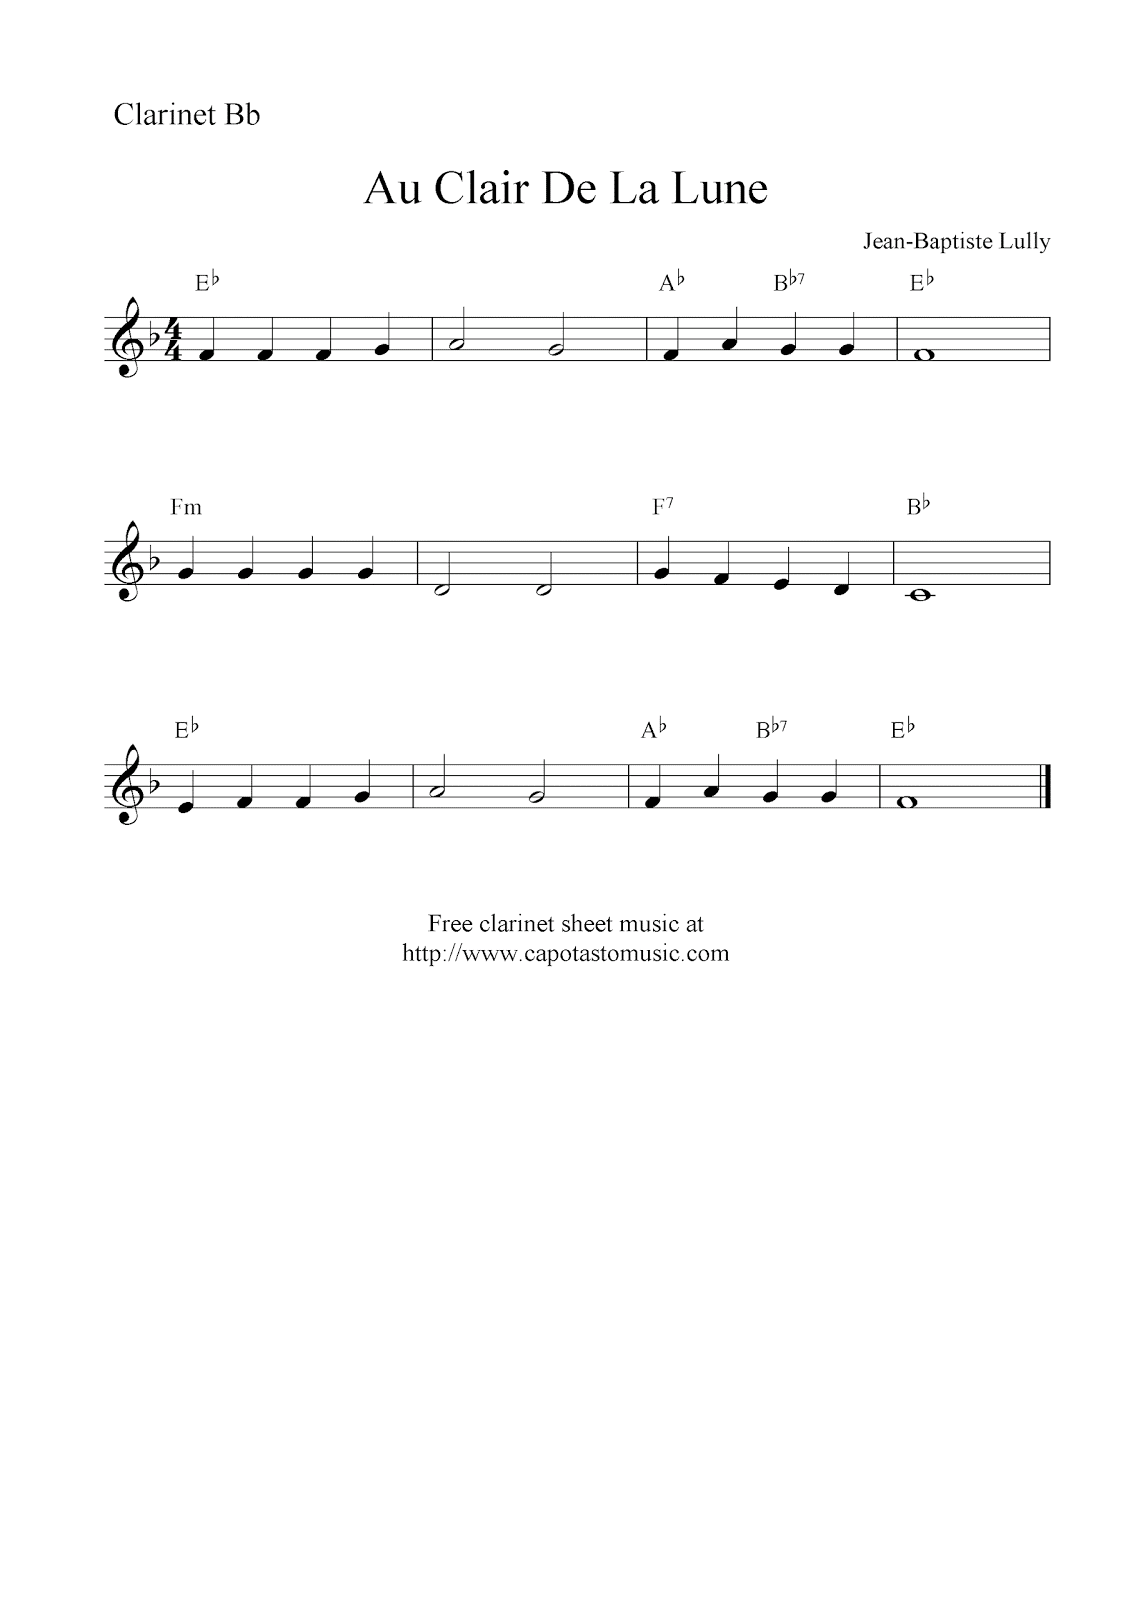
Au Claire de la Lune (Chants populaires de la France)
Known in English as “By the Light of the Moon,” this simple French folk song is an introductory music education staple.
“Au Claire de la Lune” is a great song for beginning clarinetists to add to their repertoire, as it is easy to learn and allows for some fun improvisation.
When playing this song on the clarinet, pay attention to your phrasing and dynamics to add expression to your performance.
Here’s the sheet music below.
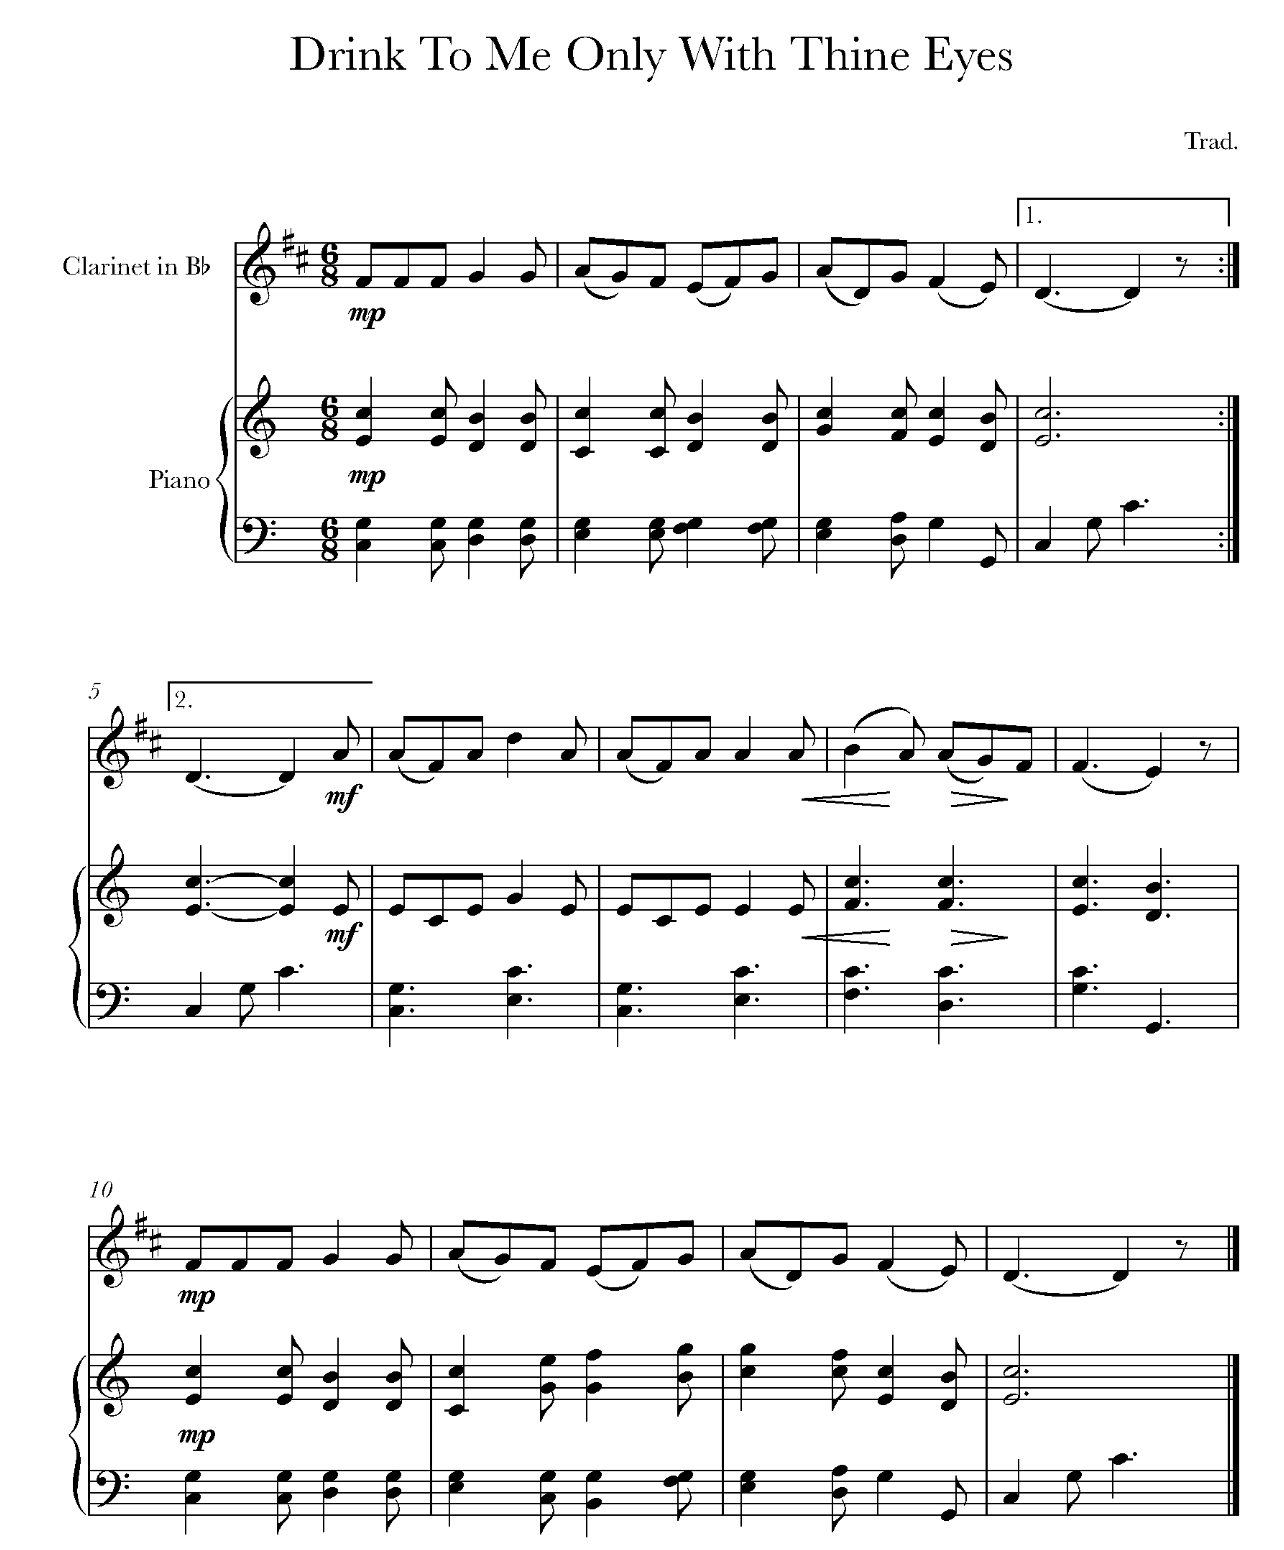
Drink To Me Only With Thine Eyes (Traditional)
Beloved by poetry lovers and classic rock connoisseurs alike, this song was famously used by historical “To Cecilia” playwright Ben Jonson (1616) and famous singer Johnny Cash.
“Drink To Me Only With Thine Eyes” is a beautiful and romantic song that is perfect for playing for a special someone.
When playing these easy clarinet songs, pay attention to your phrasing and dynamics to add expression to your performance.
Here’s the sheet music below.
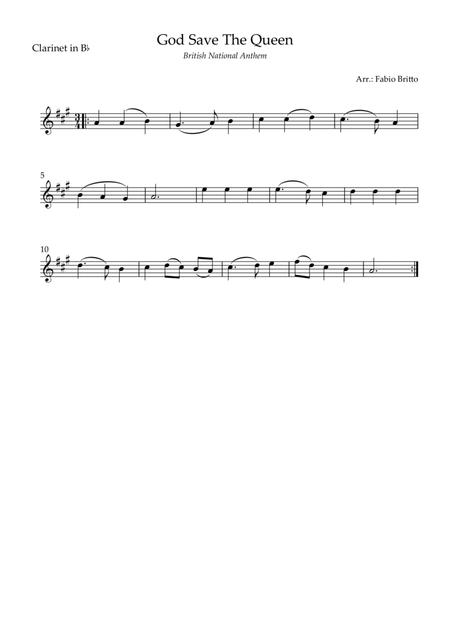
God Save The Queen (British National Anthem) (John Bull)
Played as a royal, national, and English sports day anthem, “God Save The Queen” – also sung as “God Save The King” – has been a traditional staple since 1745.
The British National Anthem is a beautiful and iconic song that evokes feelings of patriotism and national pride.
When playing this song on the clarinet, pay attention to your phrasing and dynamics to add expression to your performance.
Here’s the sheet music below.
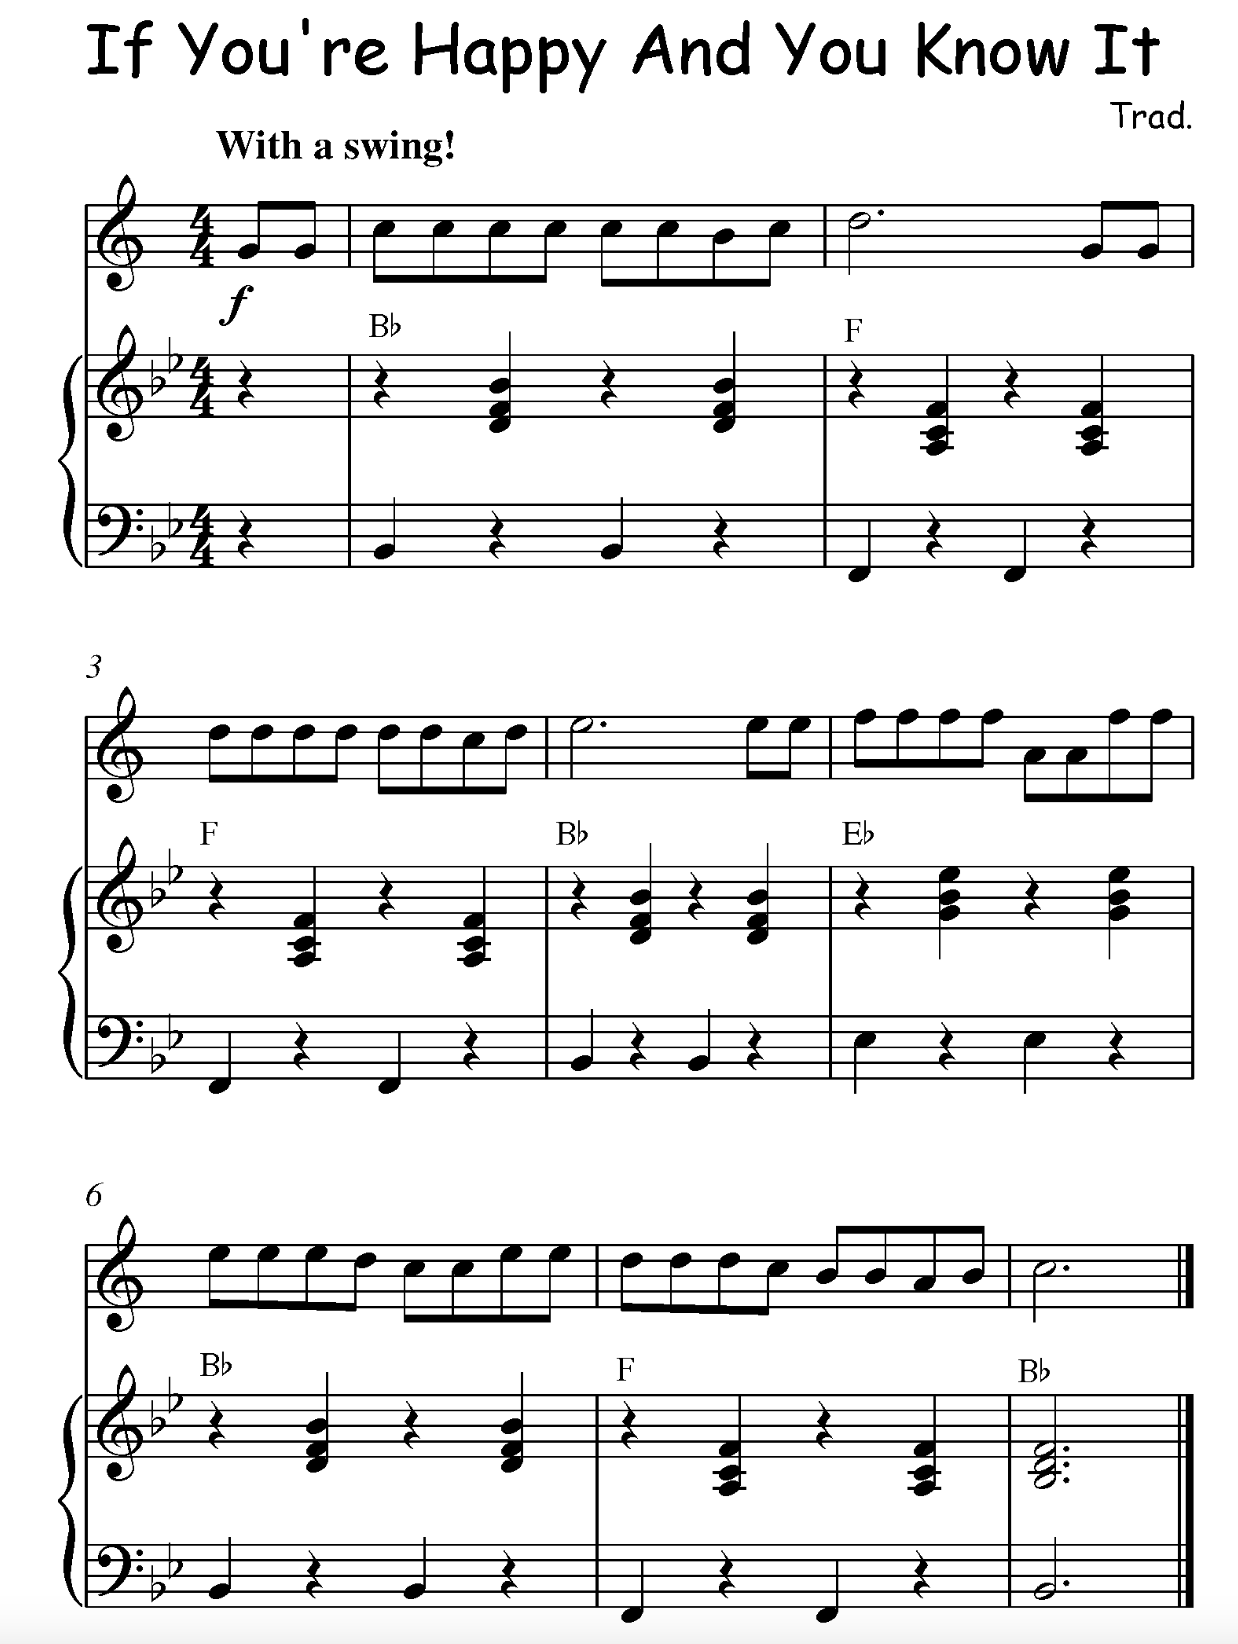
If You’re Happy and You Know It (Traditional)
You’ll have anyone and everyone nearby clapping their hands to the beat of this happy children’s song clap clap.
“If You’re Happy and You Know It” is a fun and energetic song perfect for getting kids (and adults) moving and singing along.
When playing this song on the clarinet, focus on getting a clear and consistent tone, and pay attention to your phrasing and rhythm to keep the song moving along.
Here’s the sheet music below.
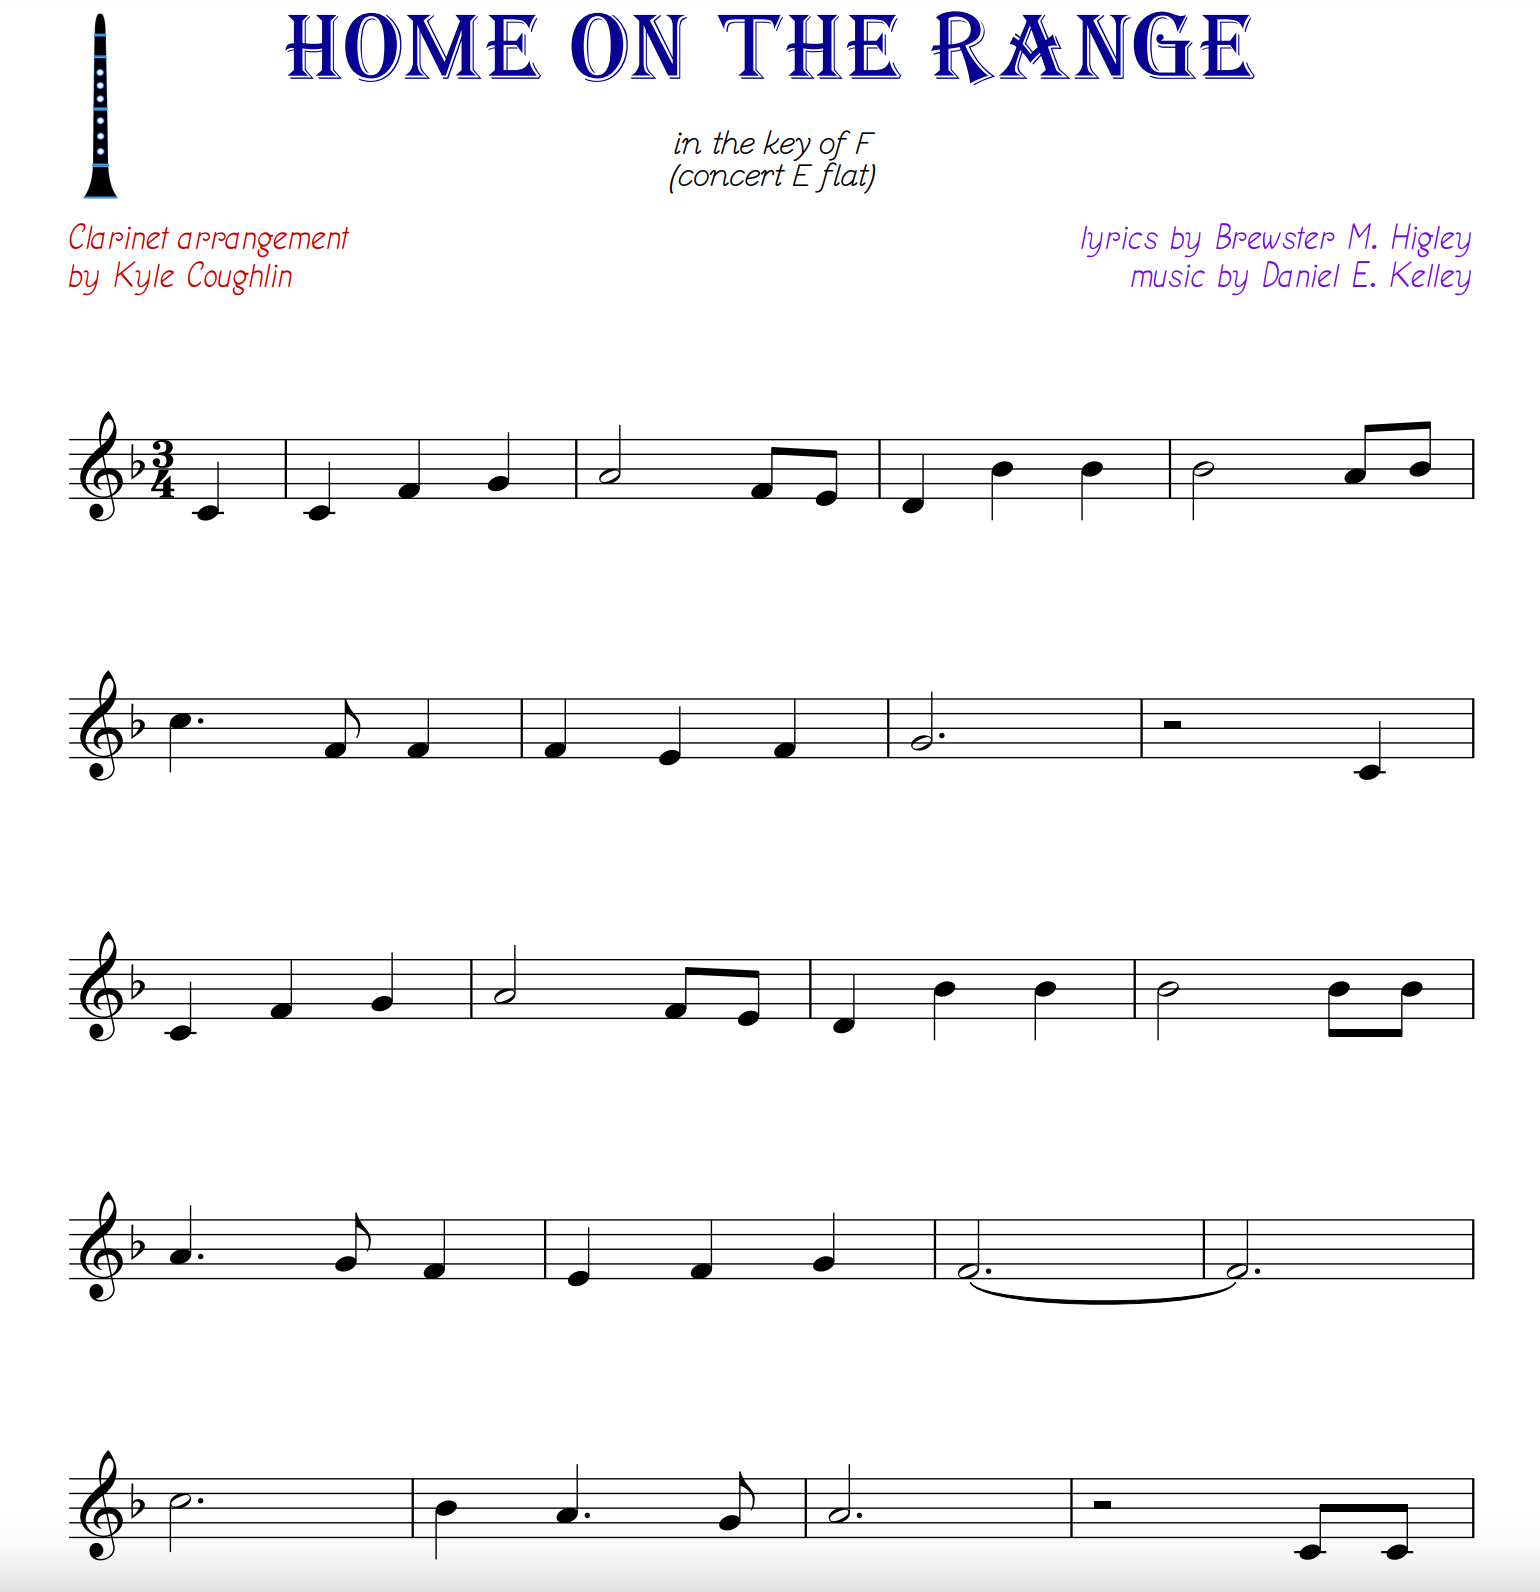
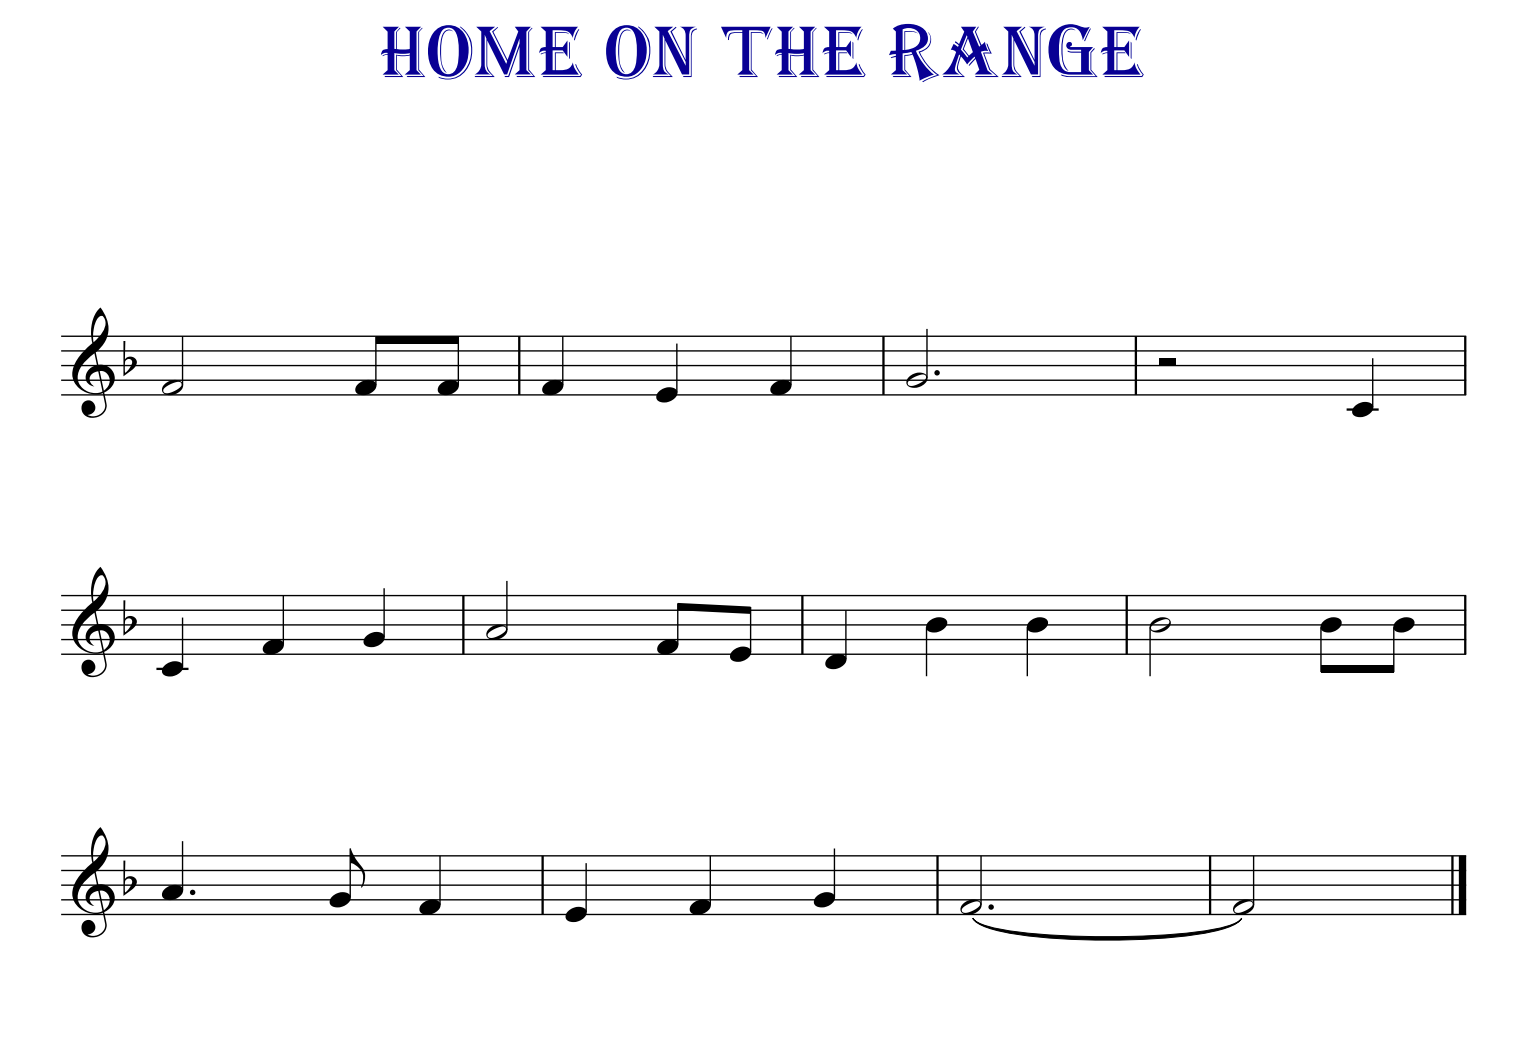
Home on the Range (Daniel E. Kelley)
Penned in the 1870s, this classic cowboy tune is one of the top classic cowboy western songs of all time.
“Home on the Range” is a beautiful and nostalgic song that evokes the feeling of the great American West.
When playing this song on the clarinet, pay attention to your phrasing and dynamics to add expression to your performance.
Here’s the sheet music below.
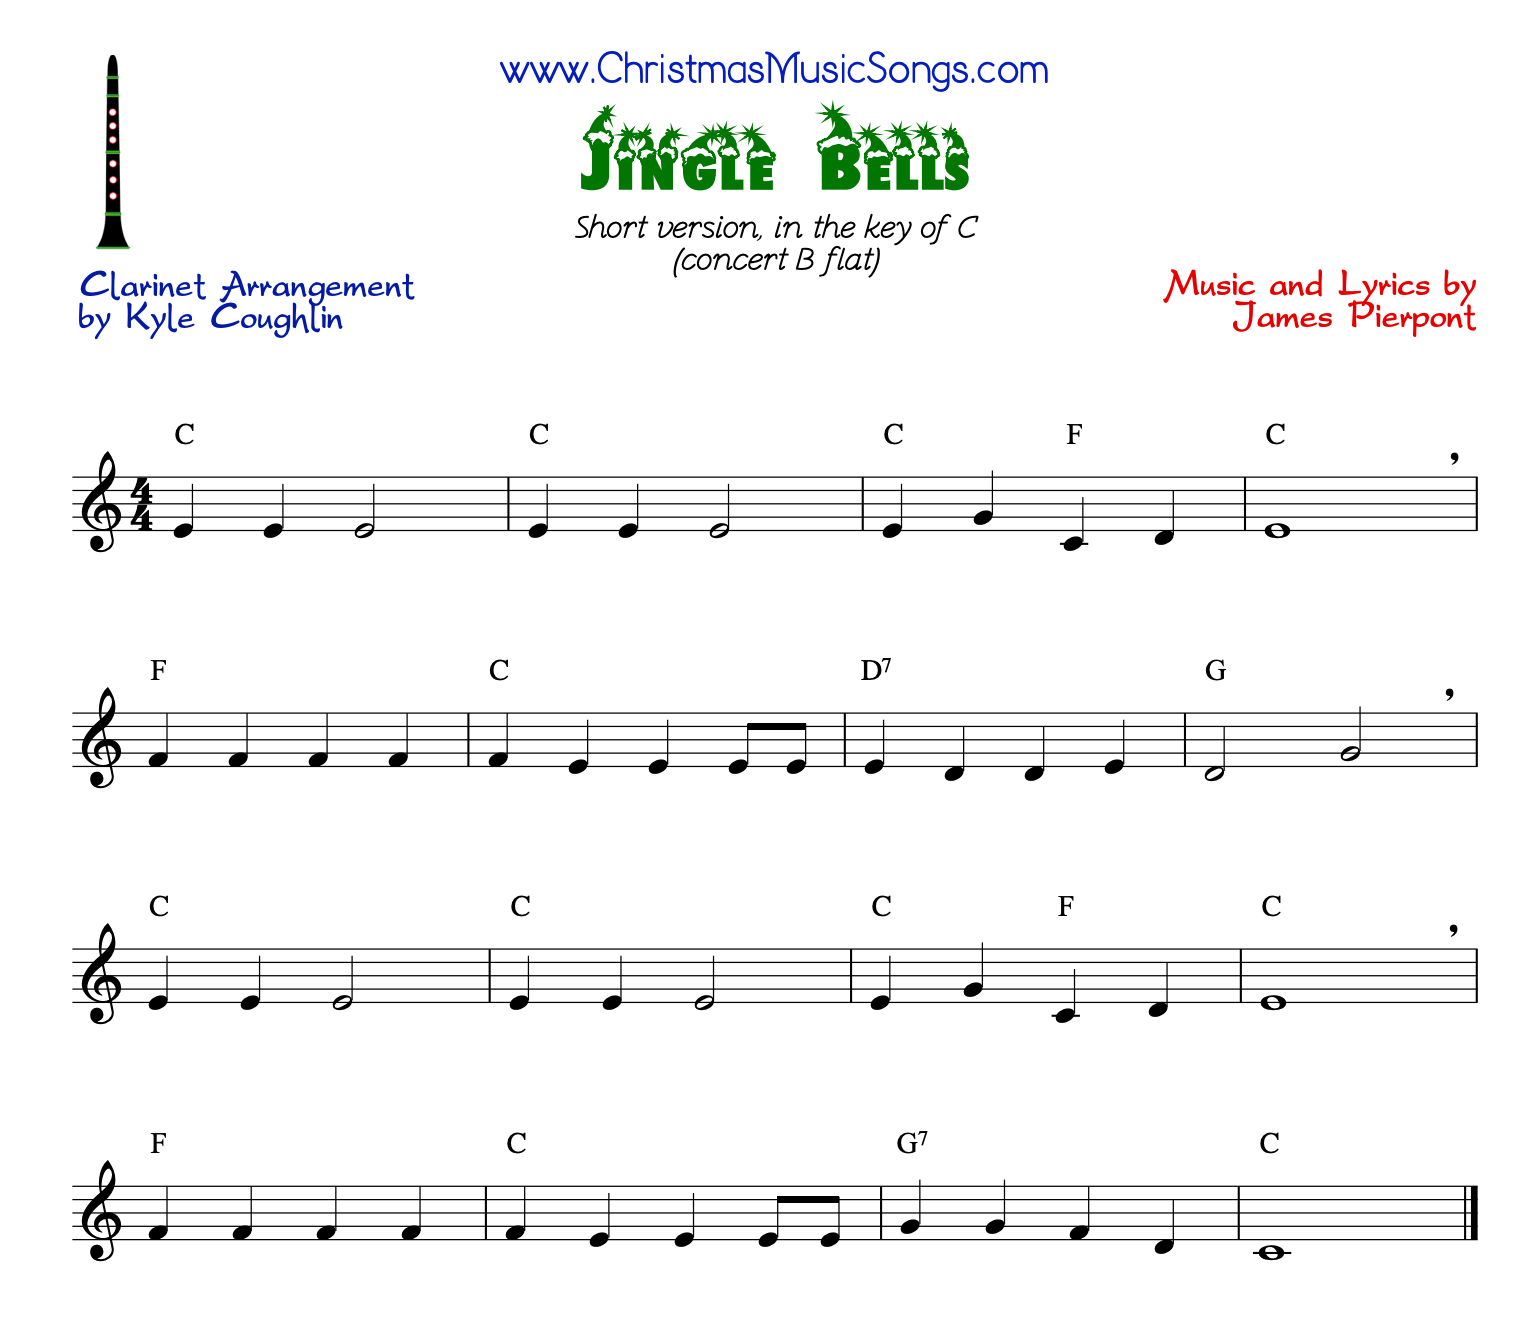
Jingle Bells (James Lord Pierpont)
One of the most famous holiday songs of all time, “Jingle Bells,” is a fun and energetic song that is perfect for getting everyone in the holiday spirit.
This song is excellent for beginning clarinetists, as it features a simple melody and easy rhythms.
When playing “Jingle Bells” on the clarinet, focus on getting a clear and consistent tone, and pay attention to your phrasing and rhythm.
For the sheet music, look below.
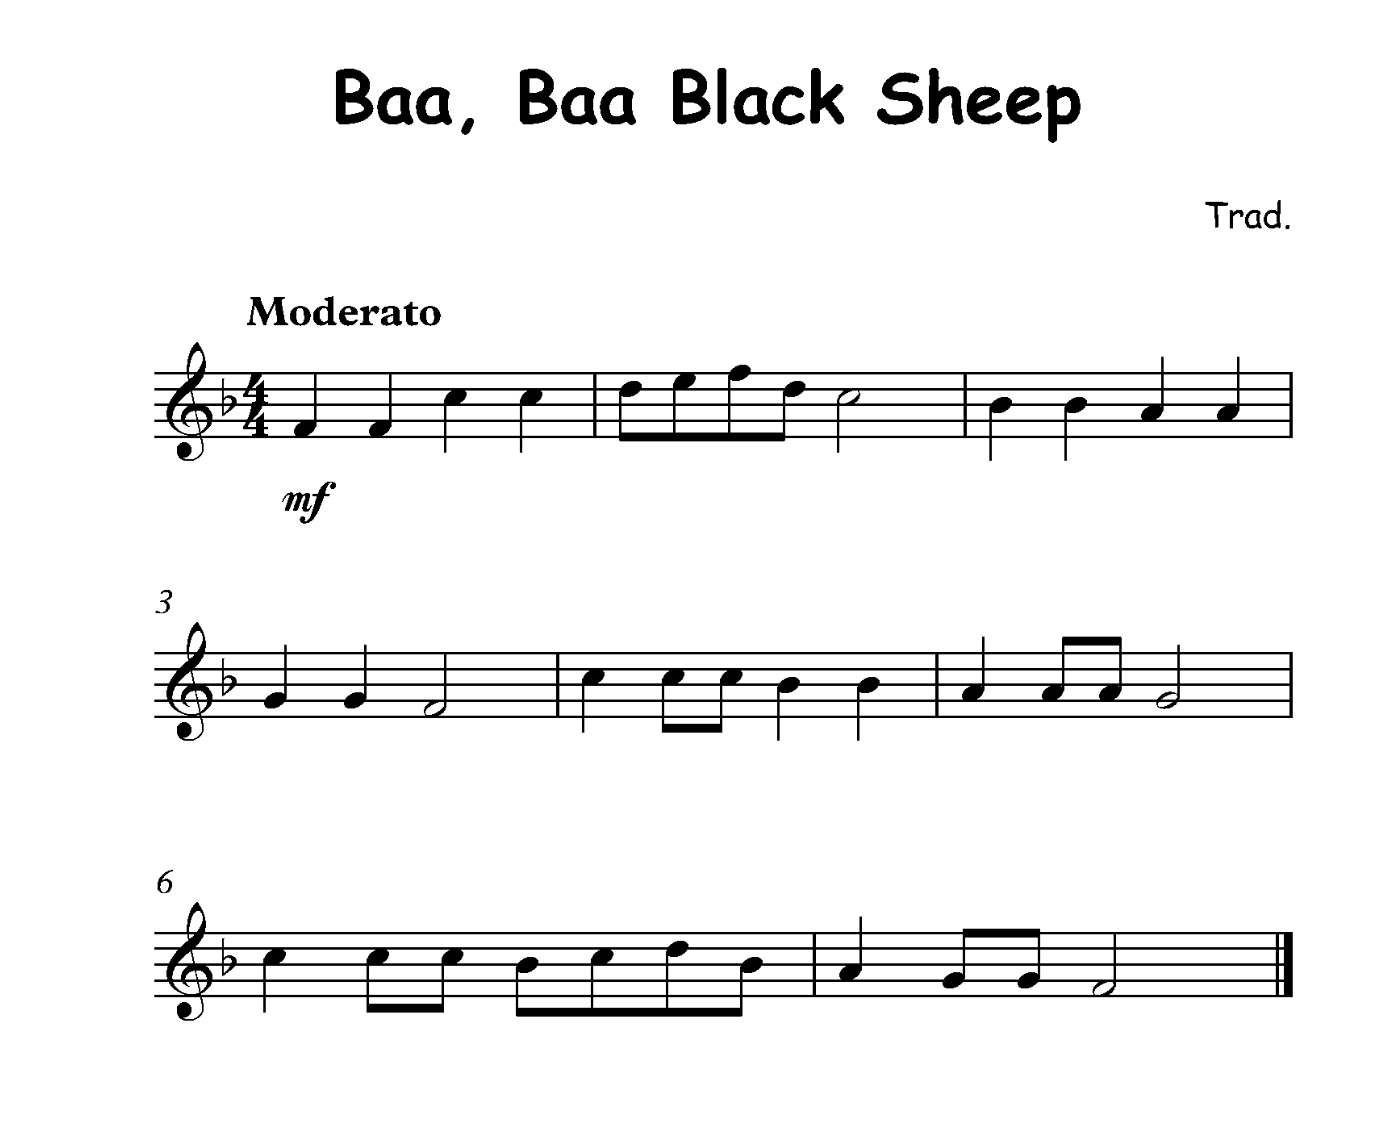
Baa Baa, Black Sheep (Traditional)
Sung to the tune of “Ah! Vous Dirai-Je, Maman,” a French melody.
This is a longtime favorite nursery rhyme, dating back to 1744. “Baa Baa, Black Sheep” is a simple and catchy song perfect for introducing kids to music.
When playing this song on the clarinet, pay attention to your phrasing and dynamics to add expression to your performance.
Here’s the sheet music below.
As we end our journey through the best clarinet songs for beginners, I hope you’ve found some new pieces to add to your repertoire. Whether you’re drawn to the timeless charm of traditional nursery rhymes, the timeless beauty of classical melodies, or the joy and cheer of holiday favorites, there’s something here for every aspiring clarinetist.
Consider Clarinet Lessons
If you’re serious about learning the clarinet, consider taking online lessons. Online music lessons are convenient, flexible, and often more affordable than in-person lessons.
Plus, with the help of skilled and experienced instructors like Dean Hughart and Vanisha Evans, you’ll be able to progress more quickly and efficiently than if you were learning on your own.
With Music 4 Humans, you’ll be well on your way to becoming the musician you’ve always wanted to be!
Music 4 Humans
December 31
2 years ago
How To Learn The Guitar By Yourself: Best Tips for Beginners
Yo, new guitar players! You ready to shred like a boss and become a guitar god? Let’s do this. We’re about to embark on a legendary journey to guitar dominance. In this lesson, “How To Learn The Guitar Yourself,” we’ll cover all the crucial tips and tricks you need to know to start killing it on the guitar.
We got you covered, whether you’re buying your first acoustic or electric guitar or teaching yourself how to play. But don’t worry, we ain’t gonna overload you with too much info all at once. We’ll take it step by step and help you learn at your own pace.
So grab your guitar, start practicing, and let’s begin this epic quest to master the guitar and become a guitar legend!
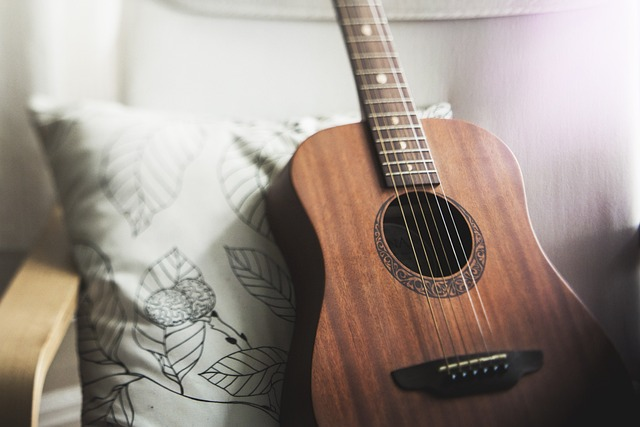
How to Buy your first guitar?
So you’re ready to buy your first guitar? Sick! But before you hit the store, let’s talk about some important things to think about when you’re shopping for your first guitar.
How Much Does a Guitars Cost?
First up, we got the dough. You might not wanna drop a ton of cash on a fancy guitar right out the gate as a beginner. That’s totally cool!
There are plenty of affordable options out there that will get the job done. Just make sure you’re not sacrificing quality for the price.
You might have heard that a top-notch guitar will run you anywhere from $300 to $500, but don’t worry. There are plenty of excellent guitars in the $100 to $200 range.
And don’t forget those “package” deals that come with the guitar and essential accessories like a tuner and gig bag. These packages can be a total steal for beginners, giving you everything you need to get started in one convenient bundle.
But don’t get too caught up in the price tag. Just because a guitar is more expensive doesn’t mean it’s automatically better. There are plenty of affordable options that can still rock your socks off.
Electric Guitar vs. Acoustic Guitar vs. Classical Guitar
Next up, we got the style. You want that classic acoustic sound or you more into the electric, rock n’ roll vibe?
Whatever your preference, make sure you choose a guitar that speaks to your personal style.
Here’s a little pro tip: acoustic guitars are the way to go for beginners. Some might think, “But I wanna shred like Jimi Hendrix!” But trust me, you can still kill it on an acoustic.
But here’s why they’re the best choice for beginners: classical guitars have a wider neck, which can be tough for younger students or those with smaller hands to handle when learning guitar.
And electric guitars, while super cool, require an amplifier to be played, so you’ll need to spend extra cash on that gear.
Acoustic guitars, on the other hand, are simple and require no additional equipment, making them the perfect choice for beginners to learn guitar.
Condition of Guitar
Before you hand over your hard-earned cash, it’s important to check the guitar’s condition to ensure you’re getting a quality instrument.
Now, if you’re buying a brand-spankin’ new guitar, these issues might not be a concern. But if you’re going the used route, listen up! Here’s what you need to do:
Run your hand up and down the neck of the guitar to make sure it’s smooth and splinter-free.
Flip the guitar over and check the heel for any cracks or gaps.
On the front of the guitar, check the bridge by running a pick between the bridge and the body. No gaps allowed!
With minimal effort, check the string height by pressing down on the first, second, and third frets. When you reach the 12th fret, the distance from the top of the fret to the bottom of the string should be no more than three times the distance at the lower frets. The guitar might have a warped neck or a bridge that’s too high if it’s more like five times.
By following these steps, you’ll be able to make sure you’re getting the best guitar for your buck!
Where to buy your guitar
Finally, we’ve got where you’re purchasing. Before scouring the pawn shops, flea markets, and yard sales, let me give you a little advice: stick to the retail music shops or reputable online retailers.
I know those other options might seem tempting, but as a beginner, it’s best to avoid them unless you’re shopping with someone who knows what they’re doing.
Trust me, you don’t want to end up with a lemon of a guitar just because you weren’t sure what to look for in terms of damage or quality.
So, where should you go? A local music retail shop is always a safe bet. You can check out a bunch of different guitars and get the chance to try them out before you buy.
If you’re buying online, make sure you’re dealing with a reputable seller. If you’re buying in person, make sure to shop around and compare prices at different stores.
Let’s Start With The Basics
We all got to start with the basics. That’s right, even the greatest guitarists like Steve Vai and Eddie Van Halen started learning the foundations.

So, let’s get started on your journey to guitar greatness by focusing on these essential concepts:
Properly Setting Up Your Guitar – The first step to becoming a rockstar is making sure your guitar is in top shape. This includes having all six strings properly tuned and intonated and having a comfortable action. Don’t know what that means? No problem! Just head to your local guitar shop and ask a professional for help. And if you need help learning to tune your guitar, make sure to take a look at our article How to Tune Your Guitar Like a Pro: A Beginner’s Guide.
Identifying String Names and Notes – Another crucial aspect of becoming a guitar pro is knowing the names of each string and the notes they produce. The guitar has six strings, with the thickest (leftmost) string being the sixth string and tuned to an E note, and the thinnest (rightmost) string being the first string, also tuned to a high E note.
Understanding Frets – Frets are the spaces between two fret bars on the neck of your guitar. These are the spaces you press down on with your fingers to play notes. We start counting frets from the top of the guitar neck, with the first space between the neck and the fret bar being the first fret, followed by the second fret, and so on.
How to Read Guitar Chord Charts
You might wonder, how do we read those confusing chord diagrams? No problem! It might seem intimidating initially, but with enough practice sessions, you’ll be reading and playing chords like a pro in no time. Here’s what you need to know:
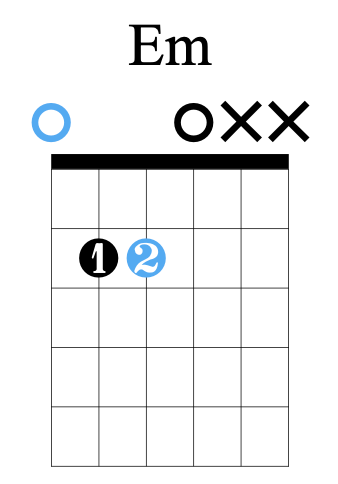
Get the lay of the land. Chord diagrams consist of six vertical lines representing the guitar’s six strings and 6 horizontal lines representing the Frets. The dots or circles on the lines represent where you should place your fingers. The numbers inside the dots tell you which finger to use (1 = index, 2 = middle, 3 = ring, 4 = pinky).
Know which strings to play. Above the diagram, you will see If there’s a “0”, you play that open string. If it’s an “X,” you skip it.
Place your fingers on the frets. Using the dots and numbers as a guide, put your fingers on the correct frets and strings. Make sure your fingers are positioned correctly, and you’re not accidentally muting any strings.
Familiarize yourself with the basic chords. Start with the most common chords, like C, A, G, E, and D. Practice guitar playing these chords and get comfortable with their sound and shape.
Strum it up! Once your fingers are in place, strum the chord downward. Experiment with different rhythms to find the sound you like best.
Easy Guitar Chord For Beginners
You might be thinking, “But I want to play like Slash! I don’t want to stick to easy chords!” Trust me, I get it. But the truth is, some of the most iconic songs in history were built on a foundation of simple chords.
Just listen to classics like AC DC’s “Back in Black” or Oasis’s “Wonderwall.” These songs use a combination of just a few chords, like A Major, D Major, G Major, and E Minor.
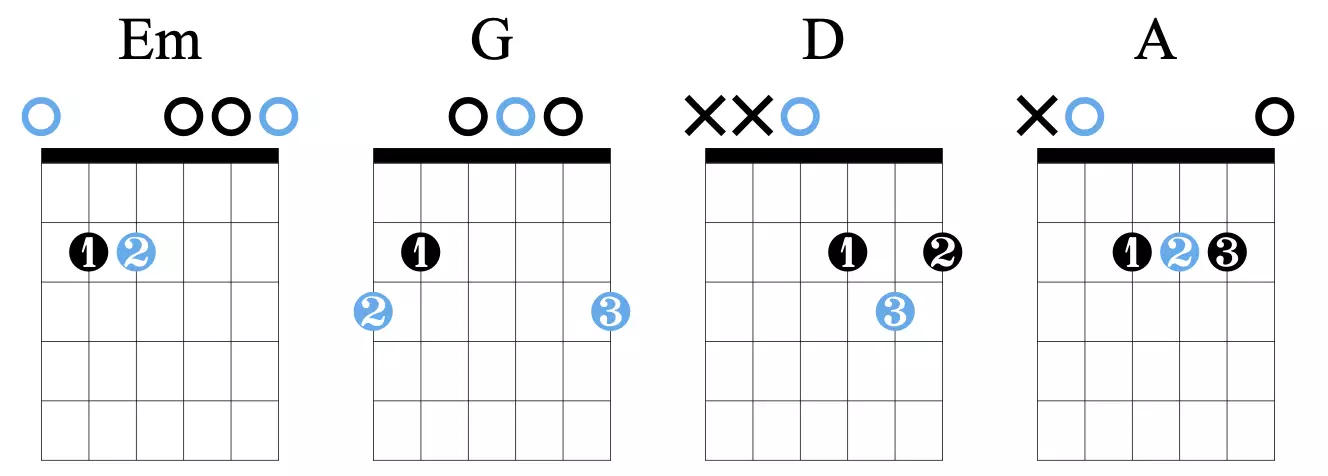
Not only are these basic guitar chords easy to play, but they also play a primary role in constructing so many memorable songs. So don’t be afraid to start with the basics and build your way up.
You’ll be surprised at how far you can go with just a few easy chords.
Strumming patterns and rhythm:
Congratulations on learning how to play your first guitar chords! You’re well on your way to becoming a guitar master. Now, let’s take it a step further and dive into some basic strumming practice sessions to get you started on the right foot.
First things first, let’s start with the basics. Familiarize yourself with some basic patterns and practice them with various chord progressions.
You can use a metronome or drum machine to help keep a steady beat. The key is to practice regularly.
Next up, let’s talk strumming technique. You can use your thumb or a pick or alternate between the two. And feel free to experiment with different rhythms, like 8th notes, triplets, or 16th notes.
The more you play around with different strumming patterns, the more comfortable you’ll become and the more your own style will emerge.
Now, let’s talk about the feel of the music. Different songs and styles will have their own unique rhythms and feel, so make sure you’re paying attention to what works best for the music you’re playing.
And if you want to take it to the next level, try playing along with a drum track or backing track to get a feel for playing with other musicians.
And most importantly, have fun! Don’t be afraid to experiment and try new things. The more you play around with different strumming patterns and rhythms, the more you develop your sense of timing and groove, and the more your style will shine through.
Learn to Read Guitar Tabs
Reading guitar tablature is a crucial skill for any self-taught musician. With tabs available for almost any song, you can quickly learn how to play your favorite tunes by simply reading the tab. A typical guitar tab looks like this:
The six horizontal lines represent the guitar strings, and the numbers on the lines represent the frets you need to place your finger. Similarly to a standard musical staff, the lines are in order of pitch. The bottom line is the lowest-pitch string, the big E, and the top line is the highest-pitch string, the small E.
But while learning songs by ear is valuable, it can sometimes be time-consuming – especially if the song is fast, long, or complex with many chord changes or tricky guitar solos.
That’s where websites like www.ultimateguitar.com come in handy. They offer accurate guitar tabs for a wide range of songs and even include ratings from other guitarists to help you know which tabs are the most reliable.
Master the Art of Scales
Okay, so you’ve got your chords and strumming patterns down pat. Now it’s time to take your guitar skills to the next level by learning the basics of music theory and playing scales like a pro.
Guitar scales are a sequence of notes played in a specific key, ascending or descending. If you recall, we discussed the names of the strings earlier – in standard tuning, the notes of the strings are EADGBE.
Similarly, every scale starts and ends on the same note, with the first note being the lower octave version and the last note being played one octave higher.
Usually, a scale consists of seven notes, but adding in that 8th note, an octave higher version of the first note, gives a sense of completion to the scale.
Mastering scales will give you the skills to create your own guitar solos and melodies and open up a new world of guitar playing. So don’t be afraid to dive into the world of scales and start shredding like a pro!
How hard is it to teach yourself guitar?
As a self-taught guitarist, I can personally vouch for the fact that it is possible to teach yourself guitar.
Just look at some of the most iconic guitarists in the world – Jimi Hendrix, Eric Clapton, and Prince are self-taught. And with the abundance of online resources available today, it’s easier than ever to get started on your journey as a self-taught guitarist.
But just because it’s possible to teach yourself guitar doesn’t mean it will be easy. Like any worthwhile pursuit, learning the guitar requires consistent effort, dedication, and practice. You must commit to regularly putting in the time and effort to see progress and improve your skills.
Being self-taught also means that you have to hold yourself accountable and discipline yourself to practice regularly. While this can be both a blessing and a curse, it ultimately gives you the freedom to chart your own musical journey on your own terms. And it will all be worth it if you’re able to play your favorite songs and even compose your own on the guitar.
So if you’re considering teaching yourself guitar, don’t be intimidated. With patience, persistence, and a lot of practice, you can become a rock-solid guitarist like Jimi, Eric, and Prince.
Remember to be consistent, stay dedicated, and never give up – the journey may be challenging, but the rewards are worth it. So, keep at it and enjoy the process!
Do’s And Don’ts Of Teaching Yourself Guitar
Here are some dos and don’ts to keep in mind as you embark on this musical adventure:

The DO’s
DO remember to warm up your fingers before each practice session. You can do this by working on a few scales or doing finger exercises.
DO practice regularly, even if it’s just for 15 minutes a day. As a self-taught guitarist, you won’t have the structure of regular lessons to guide you. Practicing guitar regularly and establishing a routine will help you hone your skills and stay on track.
DO be patient with yourself. It’s normal to struggle and make mistakes when learning a new skill, so don’t get discouraged. Celebrate your small wins and keep pushing through the tough moments.
DO start easy and master the basics. Set smaller goals for yourself and pace yourself. Work on nailing basic songs, understanding music theory, and strumming patterns before trying more challenging pieces.
DO record yourself and listen back to your practice sessions. This will help you identify areas for improvement and track your progress.
DO try new things and push yourself out of your comfort zone. Don’t be afraid to tackle more difficult scales, chords, and techniques. These will take time and practice to master, but they’ll be worth it in the end.
DO practice with a metronome to develop your sense of timing and rhythm. You can start at a comfortable tempo and gradually increase the speed as you get more comfortable.
DO jam with others and seek out more experienced guitarists to learn from. Playing with others can be a fun and motivating way to improve your skills.
DO learn your favorite songs to stay inspired and motivated. Learning music that speaks to you emotionally is much more enjoyable than dull, boring songs you don’t have a connection with.
The DON’Ts
DON’T get too caught up in the price tag when shopping for your first guitar. An expensive guitar doesn’t automatically mean it’s better. Do your research and try out a few options to find the one that feels comfortable and sounds good.
DON’T neglect the condition of the guitar when buying used. Make sure you check for smoothness of the neck, cracks or gaps in the heel, and proper spacing between the bridge and the body.
DON’T reach too high too early and set yourself up for frustration and disappointment. Start with simpler pieces and gradually work your way up to more challenging ones.
DON’T skip challenging lessons or try to rush through them. It’s important to take your time and thoroughly master the fundamentals before moving on.
A few more things to consider when learning guitar
Find a Practice Routine that Works for You
Once you’ve got the basics down, it’s time to start practicing regularly. This is where a lot of people get stuck. How often should you practice? How long should your practice sessions be?
The truth is, there is no one-size-fits-all answer to these questions. It all comes down to your personal goals and how much time you have to devote to practice.
Some people prefer to practice for shorter periods of time each day, while others prefer to have longer, more intense practice sessions a few times a week. The key is to find a routine that works for you and stick with it.
Get a Guitar Teacher or Take Online Lessons
While it is possible to teach yourself guitar, many people find it helpful to have a teacher or mentor to guide them along the way. A good guitar teacher can help you improve your skills, answer any questions you may have, and keep you motivated.
If you don’t have access to a local guitar teacher, plenty of online guitar lessons are available at Music 4 Humans. These can be a great option for busy schedules or for those who don’t have a guitar teacher in their area. Make sure to research and find a reputable source for your lessons.
Be Patient and Have Fun!
Learning to play guitar can be a challenging and rewarding journey. Don’t get discouraged if you don’t see progress immediately – it takes time and practice to improve.
And most importantly, remember to have fun! Playing guitar should be enjoyable, so don’t put too much pressure on yourself. As long as you’re having a good time, you’ll be more motivated to keep practicing and improving.
So grab your guitar, get ready to rock out, and have fun on your journey to becoming a guitar hero!
Learning The Guitar with Music 4 Humans
Are you tired of trying to fit guitar lessons into your busy schedule? Do you wish you could learn on your own time, in the comfort of your own home? Well, you’re in luck! Music 4 Humans has got you covered.
With Music 4 Humans, you can learn how to play guitar on your own schedule, whenever it works for you. So whether you’ve got a few minutes in the morning, during lunchtime, or in the middle of the night, you can get some guitar instruction thanks to Music 4 Humans.
Age ain’t nothin’ but a number; with Music 4 Humans, you can learn the guitar no matter how old you are. No matter your ability, you can play. Music 4 Humans is perfect for learners of all types and includes classes that allow people of all abilities to learn a new instrument successfully.
Righty, lefty, it doesn’t matter. Music4Humans is available in both right-handed and left-handed options, so you can learn to play the guitar no matter which hand you prefer. So what are you waiting for? Start strumming with Music 4 Humans!

FAQs
Q: I’m a complete beginner. Can I still learn guitar with this lesson?
A: Absolutely! This lesson is designed specifically for beginners, so don’t worry if you’re starting from scratch. We’ll cover all the essential skills and techniques you need to know to get started on the right foot.
Q: Do I need a specific type of guitar to follow along with this lesson?
A: Not necessarily. While some techniques may be specific to certain types of guitars (such as electric or acoustic), the majority of the content in this lesson will apply to any guitar. Just make sure you have a guitar in good condition and properly tuned, and you’ll be good to go.
Q: How long will it take me to learn guitar?
A: It’s impossible to answer this question definitively, as everyone learns at a different pace. Some people may pick up the basics quickly, while others may need more time to master certain techniques. The important thing is to be patient and consistent with your practice. You will make progress if you put in the time and effort.
Q: I’m having trouble with a specific technique. Can you help me?
A: Absolutely! If you’re having trouble with a specific technique or concept, don’t hesitate to reach out for help. You can comment on this blog post or send us a message, and we’ll do our best to help you. Remember, we’re all in this together!
Music 4 Humans
December 30
2 years ago
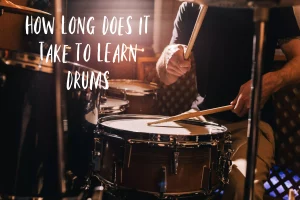
Mastering the Drum: How Long Will it Take You to Learn?
Drumming is a fantastic way to express yourself and rock out with killer beats. But if you’re new to the game, you might wonder how long it takes to learn drums.
Well, the truth is, it’s different for everyone.
Who wouldn’t love to be able to instantly play any instrument they want? Creating beautiful music in just a few minutes is undoubtedly appealing.
However, the reality is that learning drums take time and practice, just like anything else that requires skill and proficiency.
Some people are natural drumming geniuses and pick it up in no time. Others might take a little longer to get the hang of it.
But generally takes about six months to 1 year of practice to learn basic beats. Don’t let that discourage you, though! With the right amount of practice time and helpful tips, you can become a drumming pro in no time.
So keep reading for advice on how to speed up your learning journey, and you’ll play drums in no time!
Is learning to play Drums Hard?
Well, that’s like asking if climbing a mountain is hard – it depends on how determined you are to reach the top!
In all seriousness, learning any instrument can be challenging at times, and playing drums are no exception.
But here’s the thing: it’s possible. You can learn how to play the drums with the right attitude and patience. It might take some time and practice, but trust me, it’s totally worth it.
Just think of all the awesome beats you’ll be able to play once you’ve mastered those sticks. The following points will help you understand what you need to learn to play the drums.
1 – Are Drum lessons Worth it?
One of the most significant factors that affect how long it takes to learn to play drums is the source of your learning.
Taking drum lessons can make a huge difference in your drumming journey. Some drum teachers detail specific topics, while others focus on getting you playing quickly with more general guidance.
Here are some of the main benefits of drum lessons with a teacher:
Individualized instruction:
One of the main advantages of taking online drum lessons is receiving instruction tailored specifically to your needs and goals from the comfort of your home. A teacher can assess your skills and help you develop a practice plan focusing on the areas where you need the most improvement in each drum lesson.
Expert guidance:
A good drum teacher is an experienced musician with a wealth of knowledge about the instrument and can help you avoid common mistakes and pitfalls many beginners encounter. They can also introduce you to new techniques, concepts, and styles to help you become a more well-rounded drummer.
Feedback:
Having a teacher allows drum students to get regular feedback on their playing, which can be crucial for identifying areas that need improvement and keeping you motivated to practice.
Your teacher can listen to your playing, offer critiques and suggestions, and help you track your progress.
Accountability:
One of the biggest challenges of learning any instrument is staying motivated and consistent with your practice. A teacher can help you stay on track and hold you accountable for making progress. They can also provide encouragement and support when you hit a rough patch or need a little extra push.
2 – Rhythm
Rhythm and drum rudiments are crucial to playing the drums and involve maintaining a consistent and steady beat. Here are a few things to consider when learning to practice drum rhythms.
Time: As a drummer, it’s your job to keep time for the rest of the band. This means learning how to count and divide time into various rhythmic patterns and being able to play those patterns with precision and accuracy while playing at a steady tempo.
Groove: In addition to keeping time, it’s essential to develop a sense of groove on the drums. This involves playing natural and expressive rhythms that complement the music being played.
Dynamics: Rhythm also involves controlling the volume and intensity of your drumming. This means learning how to use different strokes and techniques to create different dynamics and being able to adjust your playing to match the mood and style of the music.
3 – Coordination:
Hand and foot independence: As a drummer, you’ll need to learn how to play different drum patterns and rhythms with each limb and switch between them smoothly and efficiently.
This involves developing hand and foot independence, which means being able to control each limb separately and play different patterns with each one on the snare drum, bass drum, toms, and cymbals.
Listening: You’ll need to be able to listen to the music and react to changes in tempo, dynamics, and other elements. This involves anticipating and responding to what’s happening in the music and playing in time with the rest of the band.
Warm-up exercises: It can also be helpful to do warm-up exercises focusing on coordination, such as playing simple rhythms with one hand and one foot or playing a drum pattern while tapping a different beat with your foot.
These exercises will help you improve your coordination and control over your limbs if you practice them regularly. You can start with basic beats and practice playing consistently.
4 – Drum Stick control:
Grip: To learn drums effectively, you’ll need to develop control over your drumsticks. This starts with learning how to hold the sticks correctly.
There are several different grip techniques, including matched grip, traditional grip, and hybrid grip. Experiment with each one to see which feels most comfortable and natural.
Strokes: In addition to grip, you’ll need to learn how to use different strokes, drum fills, and techniques to achieve different sounds and dynamics on the drums.
This includes knowing how to play different types of strokes, such as full strokes, tap strokes, and bounce strokes, as well as learning how to control your stick height and angle to achieve different sounds.
Practice: As with any skill, the key to improving your stick control on the drums is to keep practicing. This means setting aside time to work on your grip, strokes, and dynamics and being willing to put in the time and effort to improve.
5 – Music theory:
Melody: A basic understanding of music theory can be helpful to play drums, especially in understanding melody.
Melody refers to a song’s main theme or tune, typically carried by a lead instrument or vocalist. As a drummer, it’s essential to follow the melody and play rhythms that support it.
Harmony: Harmony is the combination of different notes and chords played or sung simultaneously. As a drummer, it’s crucial to understand how different harmonies and chord changes work together and to be able to play rhythms that complement them in the music.
Structure: Music also has a structure, which refers to the arrangement of different sections and parts in a song. It’s important to understand the form of a piece and to be able to play rhythms in ways that will support it.
Reading sheet music: Reading sheet music and understanding notation can also be helpful for drummers. This allows you to learn new songs and drum parts more quickly and communicate more effectively with other musicians.
6 – Sound and tone:
Setting up and tuning your drum kit: To get the best sound and tone out of your drums, it’s essential to learn how to set up and tune your drum kit correctly.
This involves understanding how to position your drums and cymbals and adjust the tension on your drumheads to achieve the desired sound and pitch.
Drumming techniques: In addition to setting up and tuning your drum kit, you’ll need to learn how to use different drumming techniques to achieve different sounds and tones.
This includes knowing how to play different strokes and controlling your stick height and angle to achieve different sounds.
Practice: Set aside time to work on your drumming techniques and drum set-up, and being willing to put in the time and effort to improve. As with any skill, practicing is the key to improving your sound and tone on the drums.
So how long does it actually take to learn drums?
Don’t expect to reach a point where you feel like you’ve ‘mastered’ the drums – there’s always more to learn as it is a lifelong journey! Even famous drummers keep saying there will always be room for improvement and new things to discover.
To be a top-notch drummer, you’ll need to practice drums countless hours and have a passion for constantly refining your skills. In addition, there are many styles, from jazz drummer to rock to hip-hop.
Learning about these different styles can help you expand your drumming skills and become a more versatile musician.
Conclusion on Playing Drums
The time it takes to learn the drums depends on your goals and how much effort you’re willing to put in. The key is to practice consistently.
If you’re looking to play for fun, you can pick up the basics in a few months. But if you want to play along with music, it will likely take at least six months of practice to get there.
If your goal is to play with a band, it could take several years to master the drums. However, with hard work and consistent practice, you can progress faster and reach your goals more quickly.
No matter your intentions, if you stay dedicated and put in the effort, you’ll be well on your way to becoming a good drummer!
Having a good drum teacher, especially at the beginning, can be helpful and make how long it will take to learn drums a lot faster. With Music4humans, you can get quality guidance in your drum training from experienced drum teachers worldwide. Find your dream drum teacher at Music4humans and start learning drums today!
How long does it take to learn drum? At Music4humans, you can learn various instruments and many other aspects of music, such as music theory, songwriting, music production, and so much more, from skilled private music instructors worldwide. Enroll yourself in online music lessons at Music4humans and start learning now!
Cello is a bowed string instrument that belongs to the violin family. Is it easy to learn? With dedicated practice and good guidance, your journey will be smoother. Cello requires a lot of practice time and commitment. From the early stages of your training, it is better to learn the cello in the right manner and form good habits so that you can enjoy playing the instrument in the long run. Here are tips to help you learn the cello effectively-
Tune your cello
This is the first thing you need to do. Before you start playing the cello, ensure to tune it. To achieve accuracy while playing, apart from getting the right finger placement, you need to ensure that your cello is tuned properly.
Apply rosin to the bow
To ensure that your cello sounds good, you need to have the right amount of friction between the bow and the strings. To achieve this, apply rosin to your bow. Make sure not to apply too much or too less. Too much rosin can create less friction. You need to apply an adequate amount of rosin to your bow.
Create an ambiance for your practice session
Focus is crucial when practicing. Set aside practice time from your daily routine and ensure that you are completely focused on your training during that time. To get the most out of your practice session, there should be a good flow of learning and absorbing energy without any unnecessary distractions. Make sure you have everything you need for the practice session so that you need not break the flow to go and get it.
Start with warm-ups
Playing the cello is a physical activity that can strain your muscles. Before you start practicing or performing, start with warm-up exercises. Especially for beginners, it is necessary to start practice sessions with warm-ups as their body is not used to the pressure that is required while playing the cello.
Practice scales
Practicing your scales can be a good way to warm up before your session. You can ensure that you are playing in tune, maintaining the correct left-hand position, and also perfecting your bow position.
Use rockstop or cello anchors
While playing your cello, the endpin should not slip on the floor. This can affect your performance. Rockstops or cello anchors can be purchased easily.
Practice with full dedication
It is better to practice regularly for a short duration with complete focus and dedication rather than exerting yourself once a week for long hours. Try to practice for 30 minutes 4 to 5 days a week and not 2 to 3 hours once every week.
Practice in sections
When you practice in sections, you can easily go back to the areas which need improvement and work on them before proceeding to the next section. This way you will save time and energy while practicing as you won’t need to go all the back to the beginning. You can proceed to the next section after perfecting the current one.
Record yourself while you practice
The best way to find your flaws when playing an instrument is to record your practice sessions and listen to them. This way you can understand the mistakes you are making and work on them accordingly.
Perform at different opportunities
Performing often can help you build your confidence and grow your network too. Apart from these benefits, performing in front of an audience can help you perfect your cello playing technique. You will receive criticism and appreciation that can help you grow as a cellist.
The best way to learn any skill is to keep yourself inspired. Listen to various musicians and different types of music. The more you listen and appreciate, the more you will be inspired and the more you will learn.
Learning to play the cello can be very challenging in the initial stages of your training. However, don’t get discouraged too easily. Implementing the above tips to help you learn the cello effectively. You will slowly start to enjoy the learning process. Take breaks whenever necessary. After all, you should be having fun while learning to play any instrument.
Having a good cello teacher, especially at the beginning of your cello training can be helpful, as they will be able to instill healthy cello playing habits within you. With Music4humans, you can get quality guidance in your cello training from experienced cello teachers from all around the world.Find your dream cello teacher at Music4humans and start building a good foundation for your craft.
Do you want to learn a musical instrument? Do you want to grow in your musical career? At Music4humans, you can learn various instruments and also many other aspects of music such as music theory, songwriting, music production, and so much more from skilled private music instructors from all around the world. Enroll yourself in online music lessons at Music4humans and start learning now!
Music 4 Humans
November 9
2 years ago
How to become a better at drumming?
Are you wondering how successful drummers play so effortlessly? Although they make it look easy, professional drummers have worked really hard to get to that position. In the music field, drummers are in high demand. This can make it very competitive. Continuous practice and constantly trying to improve yourself consciously is the best way to become a better drummer and gain more opportunities in your career. Here are some tips that can help you become better at drumming.
Strengthen your foundation
When trying to refine your drumming skills, you may want to get ahead of things and start learning complex pieces. However, for learning any instrument, the basics are crucial. These are your foundation that needs to be absolutely strong. You may be enthusiastic about learning and playing advanced pieces but it is important to take it slow. Start by practicing easy pieces first. Practice your basics and strengthen your foundation. Set aside time during your practice session to refine the key rudiments. You may want to discover your style. Learn about the various genres. Try finding out why you like certain genres more than others. After you strengthen your basics and you have a good foundation, pick your favorite genre and try to bring out your style.
Sometimes it’s a good idea to take a course that can help you brush up on your drumming basics. At Music4humans, you can find professional drum instructors from all around the world who can help you polish your basics through online music lessons. Book a drum lesson online today!
Try air drumming
Air drumming works for beginners as well as for professionals. It develops muscle memory and improves coordination. Pick a song, imagine having the drums in front of you, and start playing the song. Make sure to hit the right drums every time. This will help you memorize the position of the drums. Try to sync with your metronome. Imagine the drums to be an extension of your arms and legs. This will help to improve the coordination of your arms and legs.
Practice keeping time
Timing is crucial for drummers. If you feel that timing is something you lack, don’t worry, here’s an easy tip that doesn’t even require your drum kit, practice pad, or drumsticks. Clap and sing along with a song. Focus on your timing. You can use a metronome during your practice sessions.
Collaborate and ask for feedback
The right amount of good feedback and occasional encouragement can help you become a better artist. Healthy collaborations will allow you to improve. Playing with others can help you keep time and help you become a better drummer. If you are in a band, your bandmates can provide valuable feedback. A skilled drum teacher can guide you. If you have friends who are musicians, you can ask them for their feedback too.
Strengthen your weak hand
Most of us may have a dominant hand. You need both hands to be equally strong while playing the drums. To strengthen your weak hand, start using your weak hand more than your dominant hand for your daily activities. While playing, try striking the strong notes with the weak hand and use your dominant hand to strike the soft notes.
Keep yourself fit
Cardiovascular exercises can actually help you as a drummer. So start running, jogging or swimming. Playing continuously can cause strain on the muscles. So before beginning a practice session, try doing some stretches and warm-ups.
Record yourself
It’s a good idea to take a video of yourself during your practice session and evaluate it weekly and monthly. Make a note of the things you want to improve after watching the recording and try to implement them in your next practice session.
Tune your drums
When you sound good, you get inspired and motivated to do better. Tune your drums often.
Aim to improve quality while practicing
To be successful at any skill, lots and lots of quality practice is essential. More than the time you spend practicing, it is essential to maintain and upgrade the quality of your practice sessions.
Start implementing good habits into your practice routine. Passion followed by hard work and perseverance will help you succeed. The above tips along with huge amounts of effort, can help you improve your drumming skills and make you a better drummer. Try to be creative and innovative. Always remember to have fun while playing any instrument.
Plan your practice sessions and have goals that you would like to accomplish. As aspiring musicians, most of us struggle to have concrete plans while learning an instrument. We may not know which techniques to practice or how to practice effectively. A professional music teacher can guide you throughout your music-learning journey and help with your learning flow. At Music4humans, you can find skilled private online music teachers who teach various music courses such as songwriting, music theory, instruments, and so much more. Schedule a music lesson online today!
Playing Music is like time-traveling across the world. You get to experience diverse cultures through history from anywhere at any time. This is how I felt when I discovered my passion for Music. I was amazed that wherever you are from, your cultural background, or your native speech, people all have the astounding ability to understand each other through Music. Learning an instrument can be daunting if you’re new to Music or want to get better at it. This is why I came up with 5 astonishing reasons why you should learn Music.
A. Where words fail, Music speaks
Imagine knowing a language that transcends words. It is a language that allows you to channel your emotions and render them into something unique and creative. The beautiful thing about Music lies in the endless possibilities to express ourselves. Music helps people communicate, to say what needs to be said.
It is a gift to have a voice to express yourself in ways that words cannot even begin to describe. Give yourself that gift, and you will cherish it forever.
B. A universal language
During my touring years, I had the opportunity to play music with people from all around the world. I was, and still am, amazed at how much Music connects us all. Communicating ideas with people with whom you don’t share a common tongue is an unbelievable experience. A Harvard University study recently concluded that Music is universal. Yet, researchers still hardly understand why Music so deeply interconnects humans.
Music is, to put it mildly, a language that transcends words.
C. Never Too Late to start
People often say they’re “too old” to start learning Music. But are they? Sure, most professional musicians began when they were young. But the goal here is not necessary to quit your day job and start touring with your guitar! You might say, yes, that’s great, but I have no time to spare. Look at this statistic: the average person spends around 145 minutes on social media daily. This is over a month at the end of the year! I am not saying to stop using social media entirely. Social media can be an excellent tool for learning Music!
Spend some of your precious time doing something for yourself and learn something new.
D. A fit brain
How much can your brain benefit from learning Music? More than any other daily activity! Playing Music requires almost every part of your brain to work together. However, it principally involves your visual, auditory, and motor cortices. These brain exercises will benefit your music practice and empower you with those skills in other activities. In a TED-Ed animation, Anita Collins illustrates how the brain benefits from playing Music.
“Playing Music is the brain’s equivalent of a full-body workout. Musicians also have higher levels of executive function — a category of interlinked tasks that includes planning, strategizing, and attention to detail, and requires simultaneous analysis of both cognitive and emotional aspects.”
We sometimes forget that we can train our brains as we do with our bodies. So we should spend less time at the gym and more time playing Music!
E. A passion for life
Whether you want to become a professional orchestra player or strum a few guitar chords around the campfire, Music is something that sticks with you forever. When I started playing the violin, I wasn’t sure if I genuinely liked it. I needed to be patient and work hard to discover what it was all about. But as you progress, the rewarding feeling of playing Music becomes addictive. It develops your willpower, patience, and creativity.
Learning Music is like a relationship. It will have its ups and downs, and if you don’t give up, it will bring you joy for the rest of your life. Schedule a music lesson online today!
Music 4 Humans
October 8
2 years ago
What is proper piano posture?
Whether you want to learn to play the piano as a hobby or pursue it as a career, you need to perfect your techniques. Along with other important techniques, you must have heard about how important it is to learn to sit properly and have a good posture while playing the piano. What is the proper piano posture and why is it so important?
As a beginner who is trying to learn an instrument, it is important to form good habits at an early stage by learning the techniques properly. A good piano posture helps the pianist to play the piano comfortably for a long time without any body pain. It helps the pianist to have better control. Start sounding better on the piano by achieving the proper piano posture with the following tips-
Position your body properly
Maintaining a bad posture can lead to body aches in the long run. It can cause injuries too. Here is how you should position your body to ensure good posture-
Neck– Align your neck to your spine. Make sure your neck is not leaning forward. It is common for you to bend your head forward when reading piano sheet music. However, try not to bend forward. Your eyes should move to read the music. When your head bends forward it can cause strain to your neck and this can lead to body pain in the long run.
Spine– Our spine naturally has a curvature that needs to be maintained while playing the piano. Make sure you don’t bend forward or sit stiffly in an upright position.
Shoulders– Relax your shoulders and keep them in a natural position to have better control while playing the piano.
Elbows– Your elbows should be away from your body but at a distance that is comfortable for you. This will help you move freely. Also, ensure that your forearms are parallel to the ground.
Wrists– Loosen and relax your wrists. Your wrists need to be above the keyboard.
Fingers– Except for the thumb which should be straight, keep your fingers curved.
Knees– Your knees should be under the keyboard and should be positioned comfortably to reach the pedal. If your knees are placed properly at the right distance from the keyboard at a comfortable position, it indicates that the upper part of your body is also positioned properly.
Feet– Your feet should always be flat. If needed use a footrest. They should not dangle or be placed under your piano bench. If you are using piano pedals, then place them in front of the pedals. Positioning your feet properly will give you good stability while playing the piano.
Choosing the right piano bench height
You don’t want to use an armchair or any other available chairs when playing the piano. Using a piano bench chair with a height that will suit you is extremely important. You can get an adjustable piano bench where you can adjust the height based on your needs.
Distance between you and your piano
You should position yourself a little away from the piano so that you can move your arms freely. Make sure your knees are right under the keyboard. If they are away from the keyboard, it means you have positioned yourself far from the instrument and if your thighs are under the keyboard, it means you are very close to the instrument.
Placement of the piano sheet music
In some pianos, the music stand will be placed right in front of you and in some, it is placed a little higher and away. In the latter case, you may need to adjust the height of the piano bench.
When playing the piano make sure you don’t move around the piano bench. You should only stretch your arms to reach for the keys and turn your torso when needed. Having a proper piano posture has numerous benefits. You will be able to play the piano healthily, be able to move your arms freely, sound better, and express yourself better.
When learning any instrument, it is important to identify your mistakes in the initial stages of your training and correct them before they end up becoming bad habits. If you don’t know how to identify your mistakes, try enrolling yourself in music classes taught by good music teachers who can help you identify your mistakes and also guide you. At Music4humans, you can find a wide range of online music courses taught by an experienced and skilled set of music instructors from all around the world. Book your favorite teacher today!
Music 4 Humans
October 8
2 years ago
Mistakes to avoid when learning the violin
Is the violin a tough instrument to learn? Well, it certainly is not an easy instrument to learn. The initial stages can be a bit challenging as you may need to grasp the craft and gain control over your playing technique. As a beginner, it is very common to make mistakes during your learning sessions. However, you need to identify these mistakes at an early stage and make sure these don’t become a habit during your learning journey.
Here are some very common mistakes that you need to avoid while learning the violin.
Choose the right violin
To learn any instrument, you need to make sure you have the right instrument that suits your needs. Violin comes in different sizes. A full-size violin usually suits adults. However, for children, there are other violin sizes to choose from.
Avoid learning the violin with a poor posture
It’s very common to get tired while you play the violin. When you start getting tired, your posture gets affected. Due to this, the music can get affected too. It can lead to pain in your body. Maintaining a good posture is essential when learning to play the violin. In the early learning stages, you should try consciously maintaining posture so that slowly it will become a habit.
Focus on your bowing
As a person learning to play the violin, it is important to remember that bowing exercises are vital. You need to place the bow on the string with the right amount of pressure. Consistent practice of bowing techniques will help you get the right sound from your violin. So set some time apart for your bowing exercises during your practice sessions to perfect it.
Learning the violin playing techniques
You may spend hours practicing. However, you need to practice using the right techniques. You may have chosen to learn the craft yourself using tutorials, etc. and this may not be a bad idea. However, criticisms, encouragement, and guidance throughout your violin learning journey can help you improve your skill exponentially.
Nowadays, thanks to the internet and advanced technology we can learn any new skill from excellent teachers in the comfort of our home. Music4humans is a great platform where you can find many good online violin instructors to help you.
Practice properly
Quality practice is essential while learning to play the violin. Don’t just practice the easy stuff. Try challenging yourself constantly. Try finding out your weaknesses. If you have a violin teacher, they may be able to help you spot your weaknesses and give you tips on how to improve them. Utilize your practice time to strengthen your weak points. Playing the violin needs a lot of physical strength. So make sure to always start with warm-ups. This will help you practice more effectively.
Maintain the violin properly
Your violin should be in tune for it to sound right and also to help you learn properly. Before your practice sessions always ensure that your violin is in tune. Also, learn to get the right amount of rosin on your bow.
Maintain the right wrist position
To ensure that your fingers can play the notes easily, you need to maintain the right wrist position.
Maintain elbow position
As you play, you may get tired and your left elbow may start to fall. Your elbow should be away from the violin. Maintaining proper elbow position is important. So be conscious of your elbow position and take breaks if necessary. If you continue to play with pain in the elbow, it can lead to injury. Follow exercises that can help strengthen your muscles.
Take regular breaks when learning the violin
Learning a new instrument can be exciting. You may want to practice all the time and master the instrument. However, you should not strain yourself while learning it. Make sure your practice sessions are distributed evenly throughout the week so that you don’t strain your body and mind. Playing an instrument should be fun and should not lead to any stress on your mind or body. Listen to your body. If you are feeling tired, it is time to take a break and get back to practicing your instrument later when you feel better.
If you are learning to play the violin yourself, it may be hard to identify your mistakes. An experienced violin teacher can spot your mistakes and also help you correct them. Their guidance can help you form good habits at the early stages which can help you build your foundation and help you gain success in the music field. Many beginners feel that the violin can be a difficult instrument to learn. The best advice would be to not get discouraged. With passion and perseverance, you can surely master the craft and play it like a professional.
If you are interested in learning more about music or if you wish to take an online music course, Music4humans is an amazing platform where you can learn various aspects of music from skilled music instructors from all around the world. Schedule a music lesson online today!
Music 4 Humans
October 5
2 years ago
How to hold the violin properly
Have you decided to learn the violin? Although it can be a bit challenging, the entire experience can be very satisfying. Violin teaches you patience, dedication, and perseverance. In the beginning stages, you may find it difficult and overwhelming. However, the right knowledge and a good grasp of techniques can help you immensely in your training. As a beginner, the most basic technique that needs to be perfected is the way you hold your violin.
Although it is a small instrument as compared to many other instruments, it needs to be properly aligned to your entire body. We will discuss 3 aspects that you need to work on to ensure that you are holding the violin in the right manner.
Achieving right posture
Wondering how a good posture helps you play the violin? With the right posture, you can avoid long-term injuries. By practicing a good posture while playing the violin, you are essentially creating a healthy way to express your creativity without affecting your body. You will be able to play with ease which can help you to showcase your potential better. Also, the right posture can help keep good eye contact with your audience without any strain. Now, let’s discuss how to achieve it.
Body posture while sitting or standing- If you plan to play the violin seated, make sure to sit on the front half of a firm chair with a straight back. When standing, the distance between your legs should be a little less than shoulder width. Always, keep your right foot slightly behind your left foot.
Upright position- Keep an upright position without slouching. This will help you to play without strain. Maintain a straight posture but relax your muscles so that you find yourself flexible while playing the violin.
Positioning the violin
As a beginner, you may find that the violin can be an uncomfortable instrument to play. However, you can try to make it comfortable for you with good positioning. Here are the steps to get the positioning right.
Placing the violin- Start by resting the violin on your left collarbone. The neck of the violin should be facing outwards. Get yourself comfortable in this position. Shoulder rests are usually advised to help you feel comfortable while playing. You can use shoulder rests which are available separately. Consider your shoulder shape while purchasing it. While it is possible to play without shoulder rests, your violin learning experience can get uncomfortable and in the process of achieving your goals, you may injure yourself.
Placing the chin and jaw- Lower your head slowly and place your chin on the chin rest. Make sure there is no strain while doing this. Tilt your head a little to the left so that your jaw and chin are placed comfortably on the chin rest. Keep the violin at an angle so that from your nose a line should extend outwards.
Make sure you don’t grip the violin with your jaw, chin, and shoulder. It should feel natural and comfortable without any tension.
Playing the violin with the right hold
After achieving the right posture and positioning, it’s time to start playing the violin. Below are a few important tips that you should follow while playing the violin.
Hold the violin in place- Always keep the violin parallel to the floor. Due to bad posture, it may drop while playing. Keep a check on posture and keep correcting the hold. It may be difficult initially. By practicing consistently, you can create the right habits. While playing, you may notice that the violin keeps shifting from the left to the right. Just make sure that it does not deviate too much.
Hold the neck and bow properly- With your left thumb and left forefinger, gently hold the violin’s neck. The violin should be placed on the knuckle of the left thumb. Make sure none of the other fingers touch the neck of the violin. Your left wrist and forearm should be straight. Hold the bow in your right hand. The thumb should rest on the side of the bow that faces you. Just make sure your little finger of your right hand is resting on a screw and the forefinger is resting on the bow’s pad. While playing, keep the bow hair flat.
Good posture and positioning give you good mobility while learning to play the violin. Relax your body muscles before playing. You can play in front of a mirror to check your overall positioning and posture. Hold the violin upright, face forward, and start playing.
While playing, consider that the violin and bow are a part of you or an extension of yourself. This will allow you to play it more naturally and comfortably.
Violin positioning can a bit hard to master. You can take the help of a private violin teacher, who can guide you throughout your violin learning journey and can even correct you whenever necessary. At Music4humans, you can find excellent violin instructors. Start perfecting your skill and book a violin lesson today!
Music4humans is an online music learning platform that offers various music courses from experienced music teachers from all around the world. Schedule a music lesson online today
Differences between acoustic pianos and digital pianos
Playing the piano can be a great way to express yourself and develop creativity. To begin with, you need the right instrument. As a beginner, you may wonder which kind of piano is best for you. Choosing between acoustic pianos for beginners and digital pianos can be challenging. Here are some significant differences between the two that can help you decide which one to buy.
Acoustic pianos
In an acoustic piano, the keys are connected to hammers that strike the strings to produce the sound.
The vibrations produced by the strings are amplified by the soundboard.
The sound produced by the acoustic piano is rich and organic. It allows the pianist to express themself better.
There are two types- Grand piano and Upright piano The strings in the Grand piano are placed horizontally. You will need a lot of space in your home to accommodate a Grand piano. In an Upright piano, the strings run vertically. It can be easily accommodated in apartments.
Pros
The amazing sound produced by an acoustic piano is its biggest feature. The sound from a digital piano may come close but it is not the same.
The experience of playing an acoustic piano will always be special.
An acoustic piano simply looks brilliant. It can enhance the interiors of your home. It can be passed down as a legacy or resold.
Cons
Due to its large body, it can be hard to accommodate. It is pretty heavy too. Due to its weight and size, it is not easily portable.
An acoustic piano needs regular tuning.
The maintenance is tough. Humidity and heat can affect it. It needs to be cared for properly.
Moving it often can damage it.
An acoustic piano is generally loud, and this can be a disturbance.
Digital pianos
In a digital piano, the sound is produced digitally through electronic speakers.
There are three types- Grand piano, Upright piano, and portable piano The Grand piano is expensive.
The Upright piano fits more comfortably and is commonly used. The exterior of a portable piano is made using plastic. It is very light and it comes with a stand.
Pros
The Digital piano is portable.
It is easier to maintain than an acoustic piano.
Humidity and heat do not affect it.
You don’t need to tune a digital piano.
It is generally more cost-effective.
You can adjust the volume.
This makes it less of a disturbance.
A digital piano allows you to record, transfer files, etc.
Some come with other useful sounds such as drum tracks, etc.
Cons
The sound, feel, and touch is not the same as acoustic pianos.
It does not have the aesthetic appeal of an acoustic piano.
Key factors to help you choose which Piano is better for you
Budget
As a beginner, how much are you ready to invest in your instrument learning journey? Acoustic pianos can be expensive as compared to digital pianos. The maintenance of an acoustic piano can be costly. It needs regular tuning. Sometimes, you may need the help of a professional. This can add to your expenses. An acoustic piano is more sensitive to its surroundings. Unsuitable surroundings can damage the piano parts. However, with good maintenance, it can last for years. The resale value of a well-maintained acoustic piano is higher than that of a digital piano.
Sound
The sound produced by a high-quality acoustic piano is warmer and better than the digital piano.
Space
To accommodate an acoustic piano, you need to have a spacious area. It has an aesthetic appeal. Digital pianos can certainly be comfortably accommodated. However, it lacks visual appeal.
Noise
An acoustic piano is naturally loud. Whereas, you can adjust the volume on a digital piano.
Expression, touch, and feel
The acoustic piano allows you to express your creativity better. You will have better control while playing it. As a beginner, acoustic piano helps develop hand strength and finger independence. In contrast, digital pianos may not provide the same level of expression and touch.
Conclusion
In conclusion, choosing an acoustic or digital piano is a personal preference and depends on the individual’s needs and preferences. Acoustic and digital pianos both have their own pros and cons, and it’s up to you to decide which one is better for you. Whether you choose an acoustic piano that produces a traditional sound and feel or a digital piano that offers convenience and versatility, it is essential to consider factors such as budget, sound, space, noise, expression, touch, and feel before making your decision. Remember, the most important thing is to find the piano that helps you express yourself the best, and enjoy the process of learning to play it.
Hopefully, now you know which piano suits you better. The next step is to look for a good piano teacher who can guide you. Nowadays, online music classes have become popular. Music 4 Humans has qualified piano teachers who take private online piano lessons.